By Luke
Picture this: You’re sat round a
dinner table and someone asks what it is that you do, so you tell
them, and they immediately throw their hands over their face, and
whimper “don’t look at me!!”. Does that happen to you? No?
Well, to me it does. This is normally followed by a whole slew of
questions, a beckoning of girlfriends, and that staple favourite
question of straight men to makeup artists: “so do you do drag?”
I don’t mind this (save for the drag
question), I am quite happy to talk makeup and skincare, depending on
the location (funerals not so much) imagine staring into open casket
and “well we think mother’s best feature was her lips so if you
could just emphasise that....”
However, one of the things I get asked
about by far the most is concealer. This is closely followed by
foundation, but I’ll cover that in a later post. It seems that
concealer is a bit of a mystery for a lot of people. Where do you put
it? How do you put it on? Which concealers actually, you know,
conceal? The fact is that there are a ton of concealers out there, but
very few are actually doing a good job of ‘concealing’, or even
staying put. So, let me take you through what I use nearly every day
of my working life. After 15 odd years of painting faces, I believe
I have finally nailed this concealer lark.
First off the bat, there are a
gazillion different textures of concealer. Solid, creamy, waxy, et al, and there are different textures for
different things. As a very general rule:
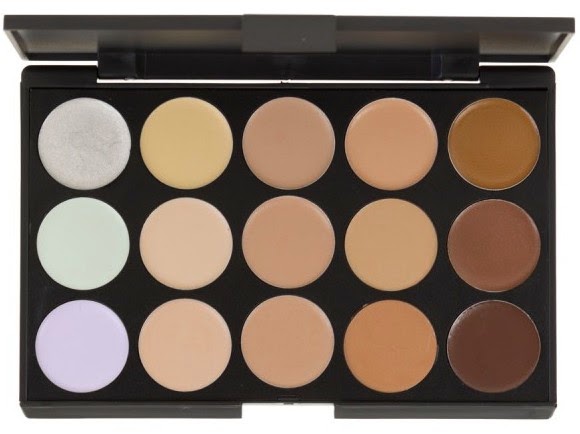
- Solid/waxy (palette) are for the face. They warm up and cool down with your face so don’t move.
- Creamy/liquid (wand/pot) are for under the eye. Nourishing, and more flexible for that sensitive area.
If it’s a spot, or the odd blemish,
the more yellow the concealer is, the better it will be at covering
that angry red look. Redness is really what you are trying to
diminish here. No concealer, no matter how opaque will ‘get rid’
of the bump or the texture. Just get rid of the colour. No bags will
be got rid of unfortunately.
Face – How to use it
- A good synthetic brush for smaller areas is perfect. Synthetic because it doesn’t absorb any of the product.
- Only cover the area that NEEDS covering, and not muller it so that you end up with this huge blob of concealer screaming at you from your otherwise perfect face.
- Dot just over the bit that you want to cover, and pat it in.
- Set with a tiny bit of a fine face powder.
- For larger areas, use a fluffy brush that will have an ‘airbrush’ effect over the area.
- Concealer will pretty much ALWAYS go on AFTER your base. If it goes on before you are likely to rub it all off again.
Laura Mercier Secret Camouflage. £26.
Multi award winning, and been around for a good 14 years or so for a
reason. There are few that top this in terms if it’s ability to
cover, and actually value for money. It’s divided into two tones,
and this on first glance can be a little confusing. The reason for
this is that there are no two places on the face that are the same
colour so it gives you the control over the colour and tine to match
where exactly you are trying to cover. I appreciate that this ‘mix
your own’ method can appear to be a bit of a faff, but in actual
fact, it is incredibly effective, and well worth spending that little
bit of extra time to get it covered.
Louise Young have a similar concept
that is also excellent. Three tonal concealers that are designed for
the face, AND the under eye areas. Again, you may need to have a play
around and mix to get the exact colour, and correct tone, but at £20
AND a brush included you really can’t beat these for value.
For under the eyes, it would be
advisable to find one that is probably about 60 -70% opaque rather
than total coverage. It doesn’t look terribly natural, and also is
more likely to look heavy and obvious.
The trick with undereyes is to get rid
of that blue/grey area right from the corner of your eye, on the side
of your nose, to about ¾ of the way under your eye. Pasting
concealer all the way along the undereye area is a bit of a waste to
be honest. The other trick is to use enough to actually cover. I
often see people putting an amount so small on that there is
absolutely no benefit whatsoever. Don’t fear it!
A fair amount is fine, and if it’s
too much keep patting it until it looks as close to your natural
undereye as possible. It’s only make up, it does come off. Be bold
with it! The best I have used are Clinique’s
Airbrush concealer. A handy little pen with a brush in several
colours that are perfect for almost all skin tones. It also has some
radiance to it that brightens in a very subtle way. Not ideal for the
face, but excellent coverage.
The other one I absolutely love is the
NARS Radiant Creamy Concealer. In a wand so super easy to use the
coverage on these are mighty, and the finish is just superb! Only a
tiny little bit is needed.
Tools
These are very important. Here is a section of
some of my favourite concealer brushes for under eye, and for the face.
It isn’t really good enough to use your finger, tempting though it
is as a) not terribly hygienic for your undereye area, and b) you do
not want a honking great finger print in your concealer.
Going from top to bottom
- Glamcor Mini Finish brush. A great mixture of natural and synthetic hair to ‘airbrush’ concealer on. Great for under eyes, and also great for buffing in a little concealer on the face. (Available from www.preciousaboutmakeup.com)
- Laura Mercier Secret Camouflage Brush. Cut small, and to a point so the flat edge of the brush can get a fair amount under the eye, and the point of the brush can be used to get a precise dot over the area you are trying to cover on the face.
- M.A.C 219 brush. SUPER fine for those really tiny areas of coverage. Tiny veins, and small blemishes, this puts the concealer on almost imperceptibly. Takes a little time, but well wirth the effort.
- Glamcor Mini Contour. Slightly fatter, and purely synthetic for a full coverage finish on larger areas. Good for scar discoloration and also darer points of birthmarks etc...
- Finally, there is absolutely no need to spend out on special brush cleaner. I have and continue to use a good antibacterial washing up liquid (fairy for some reason seems to work best for me) for all my synthetic brushes, as it’s excellent at removing grease. All of it.
The Fine Print: These are all items from my professional kit.
This post: How to do Concealer originated at: Get Lippie All rights reserved. If you are not reading this post at Get Lippie, then this content has been stolen by a scraper


