Beauty Without Fuss

Popular Posts

Recent Posts

Monday 15 July 2013

Everyday Eye Essentials


If you follow my instagram account (and if not, why not?  You can find it here) you'll notice that I've been posting a daily picture of my eye makeup, with a description of the shadows, liners and mascaras that I've used.  What I never mention are these two products, without which my eyemakeup is incomplete.


First off, if I've learned anything from beauty blogging over the years, it's that an eye-shadow primer is absolutely essential, and, after years of testing practically all of the ones on the market, Urban Decay Eyeshadow Primer Potion is the one I return to again and again and again.  If you suffer from wandering shadow, or greasy eyelids, or shadow that just disappears after an" hour or two, then primer will help.  UDPP is a rather  "grabby" primer that can sometimes be difficult to blend over, but I deal with that by adding a layer of flesh coloured shadow over the top of it first, then using any darker colours over the top, you still get a good, bright, longlasting look, but it's much easier to blend shades over the top.  I'm looking forward to trying their new "anti-ageing" primer when that is released.


And to finish off any look, it's imperative to have groomed eyebrows, and an eyebrow gel can help hugely.  My own eyebrows (even though tattooed underneath), would take over my entire face if I didn't keep them under control, so I brush through a little of this lightly-coloured gel through to tame them a little, and keep them in place for the day.


The Eyeko brow-gel has a nice little brush (which could, in all honesty, be a bit longer), and has a lightly coloured gel, which would be suitable for most shades of brows, except maybe for very red ones.  It's nice, and keeps brows in place all day.  I'm a little o_0 about the price, to be honest, as I think £18 for a brow gel is a bit on the high side (frankly, you could use hair gel just as well), but it's a good product if you want your brows to provide the perfect frame for your eyes.

What are your eye essentials? 

The Fine Print: A mixture of PR samples and purchases.
 
This post: Everyday Eye Essentials originated at: Get Lippie All rights reserved. If you are not reading this post at Get Lippie, then this content has been stolen by a scraper
Share:

Sunday 5 May 2013

Lippie's Lust List #5 - Urban Decay Eyeliner Vault


Released on May 2nd, this set of 40 of Urban Decay's eyeliners is stunningly beautiful.  I want it very much.

However, it's £240 so it can sod off.


This post: Lippie's Lust List #5 - Urban Decay Eyeliner Vault  originated at: Get Lippie All rights reserved. If you are not reading this post at Get Lippie, then this content has been stolen by a scraper
Share:

Monday 10 December 2012

Urban Decay Naked Basics Palette


Most of the hype regarding the previous two Naked palettes by Urban Decay passed me by.  Whilst I like a nice range of nude shaded tones as eyeshadows, somehow I just didn't "get" what other people were seeing in the palettes.  They are nice, yes, but, I think I prefer a bit more sludge with my shades - I found it difficult to see which shades went together in the other palettes.


So when I was offered an advance palette by Debenhams of the new Naked Basics palette from Urban Decay, I uhmmed and ahhed a bit before saying yes.  What changed my mind about this one is that it is largely matte, and it's a lot smaller than the other two palettes - I like mixing and matching my shadows from a range of sources (usually singles), and this new palette contains only six shades:


The first thing I noticed is that this palette veers towards the cool, and the pale.  Venus, the first shade on the right there, is the only shade that contains shimmer, and all the rest are completely matte.    For me W.O.S and Naked 2 work best - WOS as an all-over shade, and Naked 2 in the crease, with Faint and Crave as liners.   If I fancy a smokier look, I can use Faint in the crease, or the outer corner of my eye to make things a bit more defined.


Venus and Foxy are a bit too pale to work for me, really.  The shades are really quite pigmented, if not quite as buttery soft as I expected them to be, but they show up well enough on skin.  They are better over a base, of course, but the above swatches are on bare skin, and they still show quite well.  Crave has applied streakily for some reason in the swatch, but in use, applied with a good brush as a liner, it's actually a good, deep black that can be blended out for a smokey liner effect.


All in all, this is a nice palette, that I think I'll get a lot of use out of.  It's not - as far as I'm concerned - the most exciting palette in the world, but it's a good workhorse, and it'll be great for creating no-makeup makeup from now on.

The Urban Decay Naked Basics Palette is available from Debenhams from Tuesday 11th December.  Will you be getting one?  

The Fine Print: PR Sample.

This post: Urban Decay Naked Basics Palette originated at: Get Lippie All rights reserved. If you are not reading this post at Get Lippie, then this content has been stolen by a scraper
Share:

Friday 31 December 2010

Looking forward to 2011? Guerlain, Lauder, Dior, Lancome and Clarins are ...

Nope, haven't gone quite mad - yet - but I found these pics on my iphone today and thought I'd show you some of the things you'll be able to see on Get Lippie coming up in the next couple of months ...


Here you can see the spring/summer releases from both Dior and Guerlain (Dior on the left, Guerlain on the right).  I'm loving the pressed Meteorites powder there, and the grey lipgloss from Dior.  Dior have a new mascara brush too, which I'm looking forward to trying when I get rid of my eyelash extensions ...


Here you can see the next Tom Pecheaux collection for Estee Lauder - Wild Violet - this looks simply beautiful. I think Tom has done amazing things for Lauder since he became Creative Director, and this looks like no exception:


The palette looks amazing - I'm a sucker for purple, as most of you should already know - and the Untamed Violette eyeliner looks fab too, can't wait to try this.  The range launches at Selfridges on 3rd January, and will be available nationwide from February.


Clarins are specialising in nudes for Spring 2011, and these are some lovely shades. Personally, I can't wait to have a proper look at the one second from the right there.  Those shades of mauvy-pink are perfect for me.  There's an eyeshadow palette too, which has some lovely pinkish neutrals, which looks very interesting.


Lancome are giving us pinks and purples this spring, and this looks very pretty indeed.  That purple eye palette in particular is really calling my name.  I like purple, what can I tell you?


A closer look at Guerlain - I think I need that new Rouge G. It's red, of course I need it!


Urban Decay is launching creme blush this spring, alongside a limited edition box of all of the 24/7 eyeliners.


So ... see anything interesting?  Anything catch your eye?  If so, let me know, and I'll arrange a review for you ...
Share:

Tuesday 22 June 2010

Elf High Definition Powder vs Urban Decay Razor Sharp Ultra Definition Finishing Powder

You can't move at the moment for High Definition cosmetics. I'm not - entirely - convinced that for day-to-day wear you need cosmetics that provide coverage designed for such a specific purpose (essentially a High Definition cosmetic is one designed not to look dreadful for digital photography), but some of them do have their uses.

I'm a fan of HD powders, they're a lot finer than traditional talc-based powder, and for that reason, on my slightly dry skin, I find them quite easy to wear.  They're also slightly lighter than talc-based cosmetics, so they won't clog your pores, and they're also suitable for summer-wear over a tinted moisturiser.

I own two HD powders, firstly Elf HD Powder:


Mainly consisting of silica, this powder costs £6 and is available from the ELF website.  It's housed in a bulky black box with a sifter, and comes complete with a velvet puff to buff the product into your skin.

I also own the Urban Decay Razor Sharp Ultra Definition Finishing Powder (catchy name!  But it's essentially an HD powder like the ELF above):


This is housed in a round container, which has a built-in applicator, which makes it slightly less likely that you'll end up spilling the powder all over your feet when you're using it.  Not, of course, that I'm speaking from experience!  Their are two major differences between the Urban Decay HD powder (seriously, I cannot be bothered typing the full name out every time) and the ELF, and that is the UD is beige, and it costs £17.

So, given that the major component in both powders is silica, is there much difference between them?  Actually, yes. And no. Both feel silky on the skin thanks to the silica, and both work well as finishing powders, giving the skin a matte-ish, but not flat finish.  In fact, the ELF powder is the one I use as a finishing powder in the vast majority of my makeovers, but I do find that the Urban Decay does, in fact give a finer, softer finish on the skin, and feels a great deal silkier when rubbed between your fingertips. There's not a huge amount to choose between them to be honest.  Both involve patting the applicator over your skin, then I like to sweep away the excess with a large powder brush, to give an even finish.

All that said, which one would I buy again?  The ELF. Most likely. For my purposes, it's just that little bit more versatile.  Yes, it doesn't have the "sexy" packaging of the UD, but I don't think the fancy container justifies a three times higher cost considering the similarity of the contents. I did find, in use that the UD reminded me a great deal of Prescriptives (now discontinued) "Magic Powder", and I think it has some of the same "water-burst" technology, so people who've been yearning for a duplicate, here's your chance! For me though, I'd still buy the ELF, I can always put it into a fancy container ...

Do you own any HD cosmetics, what do you think of them?

The Fine Print: I bought these. A little while ago, admittedly, but I've still got the box the ELF came in.  I really need to tidy up.
Share:

Thursday 4 March 2010

Foundation Week - Cream to Powder


Now, as cream to powder formulations are the ones I have most trouble with, I invited two guest bloggers to try out a brand new foundation on the market, Urban Decay Surreal Skin.  Let's take a look at how Lina from Make Up to Make Out and Charlotte from Lady of the Lane got on with it:

First of all, Lina:

I was given this Urban Decay Surreal Skin Cream to Powder Foundation by Get Lippie as she needed a reviewer of darker skin and I greedily put my hand up for it! As the name suggests, it's a compact foundation that is cream in formula, but sets to powder finish. Having naturally dry skin (plagued with it my entire life - I was BORN with eczema, EW!) I was a bit dubious about how well I'd gel with this product; ordinarily, any kinda powder finish product (especially in compact form) is a massive no no. Looking quickly online to see any further info about it didn't really help much either in deciphering its target skin type.  Oh well, I'll give anything a shot!

The first thing I learnt when playing around with this was don't even bother trying to use the special brush it comes with; cheap, crappy, and scratchy. I don't even have much to cover and I could barely get ANY coverage with it. I tried a few other brushes and interestingly found my No7 Foundation Brush worked best (as opposed to my beloved Bobbi Brown one). It's quite a thick fluffy foundation brush so you could really work the product into it. And working the product into it I did! Unlike most foundations, where you start of with a little and build, I literally swirled my foundation brush in the compact, and the applied straight to my face. This worked really well and I managed to get a really good, even coverage .

What I noticed when applying it was that is it incredibly weightless, and feels really silky on your skin. It did dry to a powder finish, but luckily not so severely that it dried my skin out in the process. With a bit of concealer it made my face flawless, made up but flawless. A little bit unusual for me as I tend to go for quite light dewy foundations so this finish was fairly new to me.

The lasting power is pretty good, admittedly I found around my nose it wore off more quickly but I get that with every foundation so that's fine. I did feel the need to touch up just to freshen it up a little bit half way through the day, not the sort of product you can apply in the morning and then forget about it till bed time, but this led me to discover that it was great for building with - even hours after original application. Didn't cake in the slightest.  Neither did my skin feel particularly parched either, which was really surprising.


I'm not sure if my skin could take wearing this everyday, especially for days which start at 8am and finish at 1am, my skin would just collapse from dehydration on day 4, but it's definitely great for evenings where you want to look made up and have a powdered finish matte base. Obviously, if you have oilier skin then you could probably (happily) get away with wearing this everyday but dry skin needs a little bit more nourishment. However, in general this is good matte, powder finish product that even dry skin gals can get away with using on occasion! Just make sure you slather on the richest night cream when you go to bed to put back some of that moisture into it at night time!


Here's how Charlotte got on with it:


I’ve been using Lilly Lolo Mineral foundation for years, it works well and looks really natural which is great, but sometimes I want a more finished and polished look and so have been on the hunt for a cream foundation that suits me. Louise kindly offered to send me this one she had in return for a review as it was too pale a shade for her. So here we are.


The packaging is really rather nice. Heavy solid, transparent purple compact with inlaid design on the lid. Inside is a (very  shallow) pan of foundation and underneath that is a brush to apply it with.

Okay now brace yourselves, you need to see what I’m working with. Eeep!


I applied this on day one using the brush it comes with. It went on easily and smoothly, was easy to blend and gave good coverage to the spots on my chin, it wouldn’t need much touching up with concealer. However, I’m recovering from a cold and I have some dry skin around my nose – the effect wasn’t pretty. This stuff is definitely not for people with dry skin. The other thing I should mention is that within moments of application I started to come out in red slightly itchy blotches. These were caused by the brush. I don’t know why, or what the brushes that do this to me are made of, but an hour later the blotches were gone. I won’t use that again, but that’s not a massive problem except it loses the portability factor me as I’m unlikely to carry a foundation brush around with me.

 It lasted well throughout the day and I would describe it as light to medium coverage, it didn’t mask out my freckles and looked soft and natural.
 

I tried again today but this time used my own foundation brush, went on nicely with no irritation this time. My dry skin has pretty much gone today so the finish was much better without the clumping in the dry spots!


It’s a pretty good colour match for me and I like the finish, but it won’t be my go-to foundations for a couple of reasons:
I do get dry patches from time to time which this foundation does not suit.
The brush doesn’t work for me.
It’s not terribly buildable and if you try it can get a little cakey.
The quantity you get is tiny. It wouldn’t last me five minutes.

I take a lots of pics of myself (for my blog) and this gives you awful white face when a flash hits it, but in natural light it’s good.  I think it’s a pretty good foundation actually and I would recommend it to anyone looking for a handbag foundation compact just so long as they don’t suffer with dry skin and can afford to replace it often. I will definitely finish it, but I probably won’t replace. The search continues!


Now, in the interests of thoroughness - and because I hate to miss out! - I tried it myself, in the shade Kismet.  Actually, I surprised myself by liking it a great deal, normally with cream-to-powder formulations I find them cakey, and drying, and just awful. I didn't find it clung to any dry patches, and it gave a lovely natural finish. But ... but the brush is dreadful, don't even bother using it. It reminds me of those dreadful Benefit blush crushes, which are neither use nor ornament, I think it would be better to actually have more product and a separate, rounder brush with more bristles.  I do appreciate the packaging (it's very pretty, and portable) but the brush is only really fit for top-ups during the day, and not for a proper application. I use a flat top Kabuki (from Elf) which works way better, and I'll be talking about that a bit more later this week.

Urban Decay Surreal Skin Foundation will cost approx £18 and will be available from your usual stockists later this month.

Do you use Cream-to-powder formulations?  Which ones do you recommend?

The Small Print: Foundations used in this review were provided for review purposes.  All reviews are impartial, regardless of the source.  
Share:

Monday 8 February 2010

Urban Decay Stardust Eyeshadows

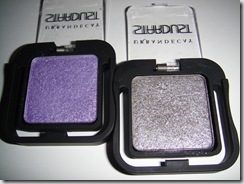
Urban Decay Stardust shadows
I was sent these little lovelies last week by Urban Decay, and I’m delighted to bring you some swatches as I’ve not been able to find any more details about them in the UK!
They’re the latest in sparkly eyeshadows, here’s what Urban Decay says about them: 
“An explosion of stars. Stardust shadows’ silky texture delivers an incredible amount of sophisticated, twinkling sparkle. Boasting 40% more glitter than our most sparkly shadows, Stardust delivers a sheer wash of color, topped with teeny bits of iridescent sparkle that glisten like wet snow.”
I received the shades 54 and Moon Spoon (and how I wish it were called Button Moon!) which are a lovely light lavender-purple and an iridescent grey, respectively.
DSC01290 I love the squeezy rubber packaging, they’re great fun to use, and they do indeed sparkle and twinkle in the package. Urban Decay say you will get no fall out with these, so I put them to the test, but first off, here are some hand-swatches:
Urban Decay Stardust shadow swatches First things first, Urban Decay aren’t kidding when they say these are sheer!  I’ve swatched these over Urban Decay Primer Potion here (there’s a dot of UDPP in the centre of these swatches, and the shadow has been swatched in a much larger circle around them), you can see there’s a hint of purple on the 54 swatch, but you can barely pick up the colour of the Moon Spoon at all.  Here’s a swatch from a different angle:
Urban Decay Stardust shadow swatches 2
These are very shimmery, and very lovely. They’re not gritty (surprisingly non-gritty, in fact!) and the fact that they’re so sheer actually makes them a lot more versatile than they would be if they were more highly pigmented. I’ve not experienced much fall out, and they’re very definitely NOT chunky glitter.  Here’s a look I created – and wore to the office! – recently with Moon Spoon:
Urban Decay Moon Spoon stardust swatch
Apologies for the slight creasing there, this was taken after I’d  been wearing it for around 14 hours.  This is a base of the two lightest colours of my Chanel Kaska Beige quad, (with a Kat von D King Cobra liner, more about that later this week!), and with some of the Moon Spoon pressed over the top.  It just gave me a gorgeously glossy shadow look without being too OTT for day wear.
These shadows really come alive under artificial light though, and I’ll bring you some more looks with them when I’ve had a chance to see how they work foiled.
Urban Decay Stardust shadows are available in 9 colours (including white and black) and will be available from Boots and Debenhams stockists very soon, will you be picking any up?
Share:

Sunday 22 November 2009

Makeover: Donna

Meet Donna:


Donna has the most lovely eyes, but she told me that she's got out of the habit of wearing shadow recently, and was looking to learn how to apply dramatic "winged" eyeliner.  When Donna does apply colour to her eyes she uses a lot of teals and purples, but we discussed something a bit different and decided that orange was the way forward!  I broke out my pro palette and got to work:

As always, we start with the base.  Donna has great skin, with some lovely freckling, so we just used a tiny sweep of Lily Lilo powder foundation as a base and left it at that:


Then we got to work on Donna's eyes.  I used this palette:


Mainly concentrating on the second row from the left there, I used the second and third shades down as a colour wash all over the eyelid area, using the slightly darker shade as a contour in the crease:


The peachy-orange really brings out the green shades in Donna's eyes, yet it's not too in-your-face.  However, I'm disappointed with the quality of the shadows themselves, the colour pay-off is pretty poor, and even attempting to foil with them doesn't improve it very much at all.  I was hoping for a much more dramatic look.  Still, the colour wash is pretty, and works well enough, just not quite well enough.

Then, onto the liner.  For this, I used Urban Decay's liquid liner in Roach, which is one of my favourite shades of all time, it's a gorgeous burgundy-brown shade that's flattering on almost everyone, as it's less harsh than black.  For a really dramatic look, I always draw the liner in a tiny right angled triangle shape right next to the lashline:


I start by drawing the upright at the outside corner of the eye, then draw a line from the inner corner to the top of the line, then fill in the triangle with the coloured liner.  It's a lot more simple than this sounds, and I'll bring you a step by step guide to how to do this soon.


Here's how the eyes looked when I was finished, we used two coats of mascara, and I think this is a great dramatic look.  Yes, it could have been a bit more dramatic, but overall I like this look.  Then I made a mistake, attempting to make up for the lack of drama in the orange eyeshadow, I thought a bright orange lipstick would be in order.  All I did then, was gild the lily:


Actually, the lipstick itself is a great shade for Donna (it's a Stila one, I've forgotten the name of, but I'll find out), it's just too much with the winged liner. We toned it down later with a more neutral lip, and it looked much more in balance.

Thank you, Donna!  I'll not gild the lily next time, I promise.
Share:

Saturday 7 November 2009

Mini Bobbi Brown Haul - and Face of the Week


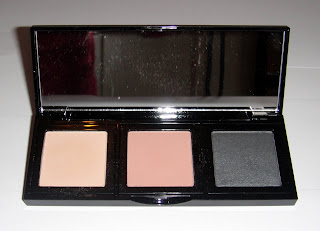
Okay, face of the fortnight, if I'm being honest ... I bought these shadows from Bobbi Brown recently, in the palette there is (L-R) Flesh, Naked and Gunmetal, and on first glance I think they look a little uninspiring, but this has been one of my very favourite purchases for a while.  I had initially been intent on buying Flesh and Woodrose from BB as some new neutral base shadows, but on swatching in House of Fraser, I realised that Woodrose is just a little too cool for my pale-custard coloured skin, so I swapped it out for Naked.  Gunmetal was a colour that I wasn't intending to buy at all (I've done two grey-eyeshadow based makeovers lately, and they got terrible feedback, who knew it was so contentious?), but I kind of fell in love with this shade in the store.

Here's how they swatch (dry, on unprimed skin) without flash and with:


You'll notice that Flesh disappears almost entirely on my skin, and you may be thinking that's a bad thing, but actually, it's not.  It's perfect for creating an even and matte base for other shadows, and when I add  Naked into the crease for a contour, I really love the effect I get, they're a lovely pair of colours for that polished and natural look I'm such a fan of.  I've mainly been using gunmetal as a softer lining alternative to black recently, and for a big night out recently (one where I knew I was going to be going out with a lot of women who don't wear an awful lot of makeup), I created this look:


Basically, I used Flesh (over Urban Decay Primer Potion), over the entire eyelid, up to the brow as a base, then defined the crease with Naked, and created a winged liner look from corner to corner with Gunmetal and I loved how the grey contrasted and brought out the brown in my eyes.  I'm also enjoying using matte shades for winter, I think they look very different to the shimmery looks I've been creating lately.

I've been doing a softer version of this look for daily office wear for the last week, combining it with Maybelline Hollywood Red, and I'll bring you a full-face version of this look soon.  I'm not showing the full face look here as I hate how shiny I am in the pics, and I've changed my foundation to a more matte formulation recently.  I'm all about the matte at the moment, it seems!

(note: I've had my eyebrows done since I took these pics, my eyebrows are the bane of my existence, Denis Healy and me, separated at birth.  Troo story)
Share:

Sunday 25 October 2009

Makeover: Sarah C

Something a little different this week.  Meet Sarah:


Today we're replicating a makeup we designed for Sarah a couple of months ago for a fancy dress party, and my inspiration for the look was Theda Bara. As always, we start with the base:


We've used a mixture of foundations to match Sarah's skin tone, then powdered it down with a smattering of Benefit Bluffdust.  Then it was onto the eyes, and we decided to use MAC Paint in Artifact, which is a lovely burgundy shade:


I applied this in an almond shape on the eyelid, then drew out the outer edges into a pointed shape.  After that, I added lashings of MAC Feline eyeliner to make it even darker:


After that, of course, time for mascara:


And then lips, we needed something dark, but still flattering, so we chose Gash by Urban Decay, as it's a really good dark red.  Sarah has lovely shaped lips for the bee-stung look, so I just exaggerated her cupid's bow a little, and drew the colour slightly inside her natural lipshape. There was no need for blush with this look:


And here's how the whole thing looked when we put it together:


I love how this looks, dramatic, different, yet still wearable for a night-time special event.

Here's the before'n'after:


Share:

Wednesday 7 October 2009

Face of the Week

I'm a very lazy person, and i appear to be addicted to routine at the moment, so whatever makeup I find myself wearing on a Monday is what I tend to find myself wearing for the next few days! Here's the products I've been wearing this week, it's very plain and simple, but quick, and pretty.


Organic Surge Blissful Daily Moisturiser (which I'm trialling for a blog post later this week)
Benefit Bluffdust - which I love for dealing with my red patches!
L'Oreal Studio Secrets foundation in Gold Ivory
Chanel blusher in Rose Defile
Urban Decay Primer Potion (depotted)
Bare Escentuals Glimpse e/s in Bravo
MAC kohl pencil in Feline (inner upper eyelid only - have I mentioned how much I love that look, and this eyeliner? Well, I do!)
Lancome Hypnose Drama in Black (of course!)
and the look is finished off with a tiny slick of Bare Escentuals Buxom lipgloss in Brandi.

Pictures of the finished look will appear tomorrow ...
Share:
© Get Lippie | All rights reserved.
Blogger Template by pipdig