Beauty Without Fuss

Popular Posts

Recent Posts

Wednesday 8 August 2012

Revlon Just Bitten Kissable Balm Stains - Lovesick, Crush and Romantic


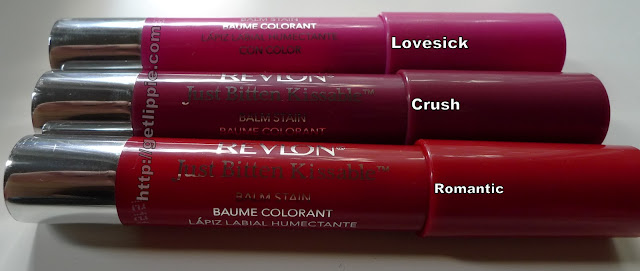
After being in total whelm with the YSL Glossy Lip Stains, I thought I'd try again.  There's been a big buzz about the Revlon Just Bitten Kissable Balm Stains around, and I thought I'd give them a thorough going-over.  I picked out three shades, a bright pink:  Lovestruck, a berry: Crush and a cherry-red: Romantic.


Packaged almost identically to Clinique's Chubby sticks, they're a good half of the price (almost a third of the price if you catch them on special offer at Boots/Superdrug etc), but Revlon's USP is the "Kissable" claim, as these are balms that leave behind a stain once the balm effect wears off.


The balms are twist-up, and provide fairly good, if sheer, pigmentation.  The range of shades isn't huge (and I haven't been able to get my hands on Honey for love nor money, it struck me as something that would be a good choice for a "My Lips But Better" look), but these are pretty, and very handy:


I took these away with me on my "summer holiday" last week, and got a lot of wear out of each:


Rather predictably, given my experience with the YSL glossy stains, I find that two of these shades don't leave much of a stain behind (Crush and Romantic), and the stains that do get left behind from these is identical - obviously the staining pigment in each of these is the same shade.  Lovesick is by far my favourite, I'm a bigger and bigger fan of pink over red lips these days.


Things I don't like: The balm only fills up half of the tube, and the taste - it tastes of dusty peppermint.  Like a boiled sweetie that's been left in the bottom of your handbag picking up lint and face powder.  It's not nice, but it wears off fairly quickly.

I'm still on the lookout for Honey though, if you see it, will you let me know?

The Fine Print: Purchases.  Yes, I always buy things in threes.  Unless it's shoes, that is.  I buy them in sixes.
 
This post originated at: http://getlippie.com All rights reserved.
Share:

Tuesday 6 April 2010

Highlighters - loose powders

Following on from yesterday's post, here's some loose powder highlighters I have.  To be fair, there's only two, but there is a reason for that, as we'll see:

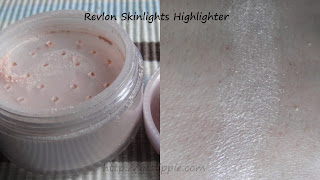
Revlon Skinlights highlighter: I'm not sure if this one is still available or not, but it's one I'm not that fond of, being a bit, well, gravelly, and exceedingly glittery. A little bit of it does go a very long way though, this pot is a couple of years old (it has seen regular use) and it's still very full.  It's great if you want to dress yourself up as a fairy, or need something with a little more pizazz. Subtle it isn't. It's also useful dusted very lightly over a matte eyeshadow look to give it a shimmery, glittery effect, which is what I mainly use it for. But it's far too glittery for use as a cheek highlight on my pale-custard coloured skin, alas.

Bare Escentuals Clear Radiance: I've had this little pot for a while, and I'll be honest, I don't use it very often.  It's not actually meant to be used as a highlighter proper (or what I think of as proper highlighter use, anyway, which might not be the same thing), it's more meant to  be used as an all-over "brightening" or radiance powder.  I find the lightly pinky peach shade is fairly flattering, more so than the more usual silvery pinks, but even so, I can't figure out a way to use this without it making me feel like I'm wearing a gauze-y mask.  Anyone else have this problem?

Am I missing a trick here?  Are there any loose highlighter powders around that are amazing? What are your recommendations?
Share:

Saturday 12 September 2009

Review - Eyeshadow Primers

Today, I've decided to to a side-by-side product test. Two of my all time favourite products are MAC Paint (which I use as an eyeshadow primer, as well as a colour) and Urban Decay Eyeshadow primer. Up until now, I'd be hard pressed to say which was better, so I'm trying them both out at the same time, with an eyeshadow that I already now disappears in the blink of an eye ... so here goes:

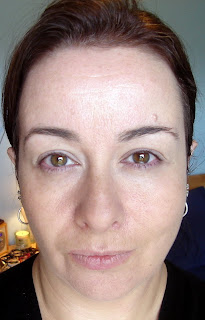
WARNING: This post will contain pictures of me without makeup.

Stage one: In which our blogger goes barefaced

At this stage, what I mainly notice is that I've neglected to groom my eyebrows, no matter, won't be making that mistake again! What I also notice is that the MAC Paint on my right eye (left on these pics) reflects the light a little more than the Urban Decay primer on the left eye (right in these pics), I think this is because there is a little hint of shimmer and pigment in the MAC, which the UD is missing.

Stage Two: Wherein the experiment begins in earnest


At this stage, with both eyes open, there is little difference, but with my eyes closed, you can see that the UD primer is definitely better at grabbing the pigment, and the colour is truer. I'm using a loose shadow from Bare Essentials (Smoked Clay), which is a nice greenish grey, but that's hard to pick up with your brush. However, there is a price to pay for this extra pigment being visible, as you'll see in the next stage.

Stage Three: Wherein the colour deepens

I thought that the shadow I was using was too wishy-washy in the first pics, so decided to go for another layer of colour. When applying this, I realise that the Urban Decay is damned difficult to blend over. In fact, it's damn near impossible to blend over after it's had a chance to set for a minute or two. This means that there is a visible line in my socket-crease on my left eye (on the right there), which I'm finding infuriating. Blending is important, vitally important, to any good make up, and the Urban Decay simply won't let you do it.

Stage Four: In which my mascara is uneven.


Here, I've finished adding my eyeliner, and just wanted to see what the difference was between no mascara and one layer of Hypnose Drama (upper, pic) and with two layers of mascara (lower). What it has done is highlighted the fact that I have thicker lashes on my right eye, but longer lashes on my left. I'll be sticking with one coat from now on, I think.

Stage five : in which the finishing touches are revealed

I got around to powdering, adding blush and putting on some lipstick (Ellis Faas in L307, a lovely glossy coral shade) but not fixing that damn eyebrow. That's obviously why I'm looking so unhappy.

Stage six: In which your blogger fixes her hair, and her expression
There we go, I've covered up my pointy spock-ears, and am feeling more human again.

Verdict:

At the moment, they're fairly evenly matched. Whilst you do get a better coverage, and colour trueness with the Urban Decay, this is outweighed with the MAC Paint being easier to blend with. Now, I'm going to see how this look lasts throughout the day, and report back.

Products used:
Urban Decay Eyeshadow Primer
MAC Paint in Untitled
Bare Essentials powder shadow in Smoked Clay
Revlon Wet/Dry Liner in Chocolate
Lancome Hypnose Drama in Black
Bare Essentials Blusher in Poppy
Benefit Bluff Dust face powder
Ellis Faas Glossy Lip in L307
Share:
© Get Lippie | All rights reserved.
Blogger Template by pipdig