Beauty Without Fuss

Popular Posts

Recent Posts

Monday, 22 March 2010

Eyeliner Masterclass featuring MakeUpByKaty

I'm always being asked how to do eyeliner, so, I thought rather than have you deal with my rambling thoughts on the matter, I'd ask an expert on your behalf!  Please welcome the astonishingly talented international makeup artist Katy, from Make Up By Katy, (who also blogs under the same name, which you can see here).  Take it away, Katy:

***

Hi Girls,

I've been asked by a few people to take them step by step through my eyeliner technique. I do try and show this on my video tutorials but will admit that I often skip over it so as to get to the fun part which is the colour! However, this is a very important part of all my looks so I think it's a good idea to go through it, step by step.


Firstly, I use a cake liner, this works better than a gel liner and especially safer than kohl. This is a Kryolan cake liner, the very best that I have found. It doesn't smudge, flake or run and it's a true black. It's also available in other shades such as brown and navy which are worth getting for a softer look. The brush needs to be synthetic, tightly packed and totally flat. No slants, no domes and definitely NO points. The cake liner needs to be mixed with a small amount of water to create a paste. Think of the texture as being similar to runny mascara.


Let's start by going through application of Step 1.   This takes a steady hand so it might be worth sitting down and resting your elbow to create a pivot. You can use your free hand to lift the lid slightly, or, as shown just place the brush under the lashes and press and wiggle right into the roots. Start in the centre and work outwards, then from the centre inwards. The end result should look like the 3rd picture along. Ideally there won't be any liner on the inner rim. If there is, simply take a cotton bud, dampen and gently run along to remove. I take the liner from lash end to lash end. Going right into the inner corner is much more dramatic, so probably best saved for evening.


Step 2 is similar to Step 1, although the brush now sits on top of the lashes. This is not to create a liquid liner effect. This should be placed in the same point as before, in-between the lashes. As you can see, the lashes are pulled down and the end of the brush is hitting the same spot as from underneath. This helps to darken the roots of blonde eyelashes, as often mascara won't reach this part. The end result of this is a clean, defined look. If mascara is put on, this line disappears and all that is left is the impression of fuller, thicker lashes. Nice!

This eyeliner trick can be worn alone, or with a soft shadow for a natural look. I'm going to take you through how to create a smoky eyeliner look using just a kohl pencil and one brush.


Above are 3 brushes, from left to right: Shu Uemura Kolinsky Brush 10F, Laura Mercier Corner Eye Brush and Laura Mercier Smoky Liner Brush. These would all be suitable to use for this step but would give different finishes. The longer and larger the brush head, the more smudged the liner would be. I wanted a reasonably small smudge so I used the Smoky Liner Brush.


I used my favourite Kohl pencil. Prestige Total Intensity Pencil. I urge you to give this a try. It's under £5 from Boots! I'm just doing a line along the top in this demonstration.


Note how I have the pencil on its side. This is the easiest way to run the pencil along the lashes as you can almost use the lashes to rest the brush on. The issue of wiggling the pencil in-between the lashes to darken the roots is no more as the cake eyeliner is already there, creating a base for your kohl.

I start in the centre, above the iris and work outwards, coming to the inner corner at the end. I wanted to open my eye up with this technique so I have lifted the liner in the centre as opposed to creating the width at the outer corner.

Before smudging


To smudge I take the brush and run gently along the edge of the line, pulling upwards as I go as I'm not looking to pull the line outwards. Note how I'm holding the brush at the same angle as the pencil. I'm using the long edge of the brush as opposed to the fine point.  The end result should look soft, blended and subtle.

Below is the end result, sans Mascara. For an evening transformation, I'd simply take the pencil, dot very subtly under bottom lashes and use the Shu Uemura 10F brush to work right into the lashes. To intensify further, I'd line the inner rim too.


I hope this has been helpful and interesting!


Until next time,

Katy

***

Don't forget you can see more of Katy's beautiful and helpful tutorials on her blog at http://makeupbykaty.blogspot.com/ Thank you so much for creating this masterclass for us, Katy! I hope my readers find it useful.
Share:

Sunday, 21 March 2010

Mini Makeover - Ruth

Yes, it's a mini-makeover again this week, mainly because I AM the world's worst photographer, and I owe Ruth a massive apology as a result.

Anyhoo, on with the "show", as they say!  Please meet Ruth:


Ruth is someone I've known virtually for longer than I care to remember, but up until her makeover we'd never actually met in the flesh!  Ruth runs Love it Love It Love It (should be live this weekend!) which is a website that sells the most amazing clothes for babies and toddlers in BRIGHT colours - none of this pastel rubbish.  Please go take a look if there's a child in your life, there are some gorgeous clothes on there, and I'm going to be placing a couple of orders myself soon!

Okay, because the photos I took were so dreadful, we're going to skip straight to the after:


Ruth was looking for a funky look, so I told her we were going to do PINK!  And we did.  I think Ruth was a bit scared I was going to make her look like a refugee from 1986, or something, but I think I succeeded in avoiding that particular fate. Well, hopefully ...

Products used:

Benefit You Rebel Light
Benefit Bluffdust
Milani Runway Palette in pink
Bourjois Ultra Care Mascara in black
Cargo Plantlove Illuminator in Wind
Lipstick Queen 15 minutes of Fame gloss in minute 3

Here's an entirely gratuitous pack shot of the Milani palette, it's not very pigmented, and the colours can be a little chalky, and difficult to blend as a result, but they're very pretty shades, and it cost only £3.49 from Beauty Base in Westfield:

Share:

Beauty Blog Link Love

 Over at theNotice, Rae shares an amazingly pigmented bright blue eye -- done with shadows from the drugstore!


This week, Louise gets an (almost!) exclusive look at a Lancome mascara that has them queuing down the aisles in Harrods, and promises better lashes in a month.
 
Yinnie Dances with the fairies with her fairy inspired EOTD.
 
Phyrra dishes with Britton from Haus of Gloi for this month's Indie Spotlight at Fresco Phyrra.


Blaq Vixen Beauty decides to treat her skin to a Clinique Even Better Clinical Dark Spot Corrector Regimen!

Retrodiva checks out three new innovative drugstore foundations. See which ones she would recommend!
 
Krasey Beauty takes a trip across the pond to bring you complete swatches and a review of MAC's newest, Give Me Liberty of London.
 
Looking for a great cream eyeliner that won't break the bank? Lipglossiping may have just the thing...
 
Sophie from melovemakeup talks about how much she loves Trilogy's Everything Balm.
 
TheLipPrint adds a little more Allure to her life with Chanel.

Michelle at Lipstick Rules laments her Liberty Of London lipstick purchases... but then finds a way to make it work!
 
Check out the swatches of Yummy Mummy by butter LONDON at Makeup4All.
 
Lisamarie from Beauty Crazed falls in love with the 10 year anniversary editions of Lancôme Juicy Tubes!
 
Follow Jellyminx's step-by-step tutorial for a pinky-coral look for Spring.
 
Over at Music and Make Up, Jo celebrates her birthday with a purple smokey eye courtesy of MAC's Violet Pigment.


***


Beautywoome has a giveaway with Europe's coolest new beauty brand. Win 1 of 10 Ellis Faas Ellis Red lipsticks.
 
Audrey Dao is giving away $89 worth of Napolean Perdis makeup as part of her 1 year blog anniversary.
 
Mz More at The Glamorous Gleam is having a giveaway in honor of her 200+ Followers. Check out the goodies galore!
 
Cindy from Prime Beauty gives you the Golden Ticket to win a Bliss "Best of Bliss Set".


Hope you enjoyed this week's Link Love! See you soon :)
Share:

Saturday, 20 March 2010

Shameless plug!


One of my lovely readers - Nick, look out for her in a makeover soon! - has nominated me for a Little Blog award on the Dorset Cereals website.  If you click here to vote for me, you could win yourself a prize, too!
Share:

(Not Quite) A Hair Disaster ...


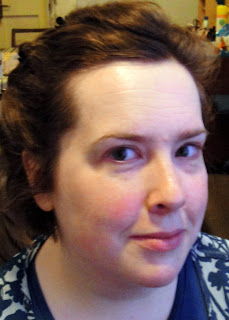
Was at the hairdresser yesterday, and this is the fruit of their labours.  It's beautifully shiny, and I love how they dried my hair, although it dropped quite drastically on my rainy walk to the tube, but ... well, I did NOT enjoy my salon experience all that much.

I've mentioned before that I find trying new hairdressers a bit stressful, particularly when it comes to colour, and yesterday's experience wasn't one that'll have me beating a path back to to this particular salon's door, I'm afraid. During the initial consultation, the stylist ignored my requests not to make it too dark, and completely dismissed my suggestion that maybe she could mix two shades, (the sample swatch was a really "flat" brown, and my hair has a lot of red in it, naturally, and I wanted the colour to reflect that).  Then, she called over another colourist with the express purpose of having two people telling me I was wrong.

Nice.

The rest of the colour process was fine, two colours  were mixed and it was pretty uneventful (except being repeatedly called "hunni", which drove me nuts, "Are you alright, hunni?" "Do you need a magazine, hunni?" "I'll just be another hour with this other customer, hunni, okay?" Seriously I could practically see the heart-shaped dot over the i), and after the least relaxing, and actually quite painful rinse-out - seriously, I spent the entire thing in a flinch, and I LOVE having my hair washed! - I went over for the blowdry, with another stylist.

And I loved it! She asked me if I wanted something bouncy, and she did a wonderful job, just what was needed.  My hair was glossy and full of body, bounce and shine.  Simply perfect.

But ... the colourist then came over, and pronounced "See! Not too dark at all! We knew what we were doing all along!".  Well, actually, it is too dark - and it hasn't escaped me that it would have been darker still if I hadn't put put my foot down -  it's just not as dark as I was scared it was going to be.

But I was feeling thoroughly patronised at this point, so when she went on to point out the virtues of me not ever using permanent dye again (in that special voice people tend to save for the elderly, the insane or the foreign, you know the one I mean), I'd about had enough. I know I'm not trendy, I know I'm not young'n'funky any longer, and  I know I've made a few jokes recently about being senile, but I am not ready to be treated like an elderly maiden aunty who has just asked for a violet rinse in Toni & Guy ....

I didn't complain, because, really, how do you complain about being patronised by someone half your age?  And what would the salon have done anyway? My hair, actually, is fine, I just hated every moment of the experience!

Here's a pic to exmplify how much darker it is than usual:


Like I said, it's not bad, it's just ... not what I wanted.

So, can everyone tell me about their hair disasters please, so I don't feel too much like Morticia's granny any more?
Share:

Friday, 19 March 2010

Chanel Coco Rouge Swatches


I make no apologies whatsoever for featuring Chanel's latest lipstick offerings once again. Beyond gorgeous formulations, pigmented, light and beautifully moisturising, they're everything YSL Rouge Voluptes should be, but aren't (I'll give you my thoughts on those another time).


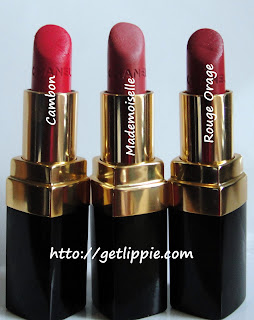
Since I unexpectedly picked up Cambon way back in January, I've since been out and bought two more, Mademoiselle, and Rouge Orage.  Cambon is a bright - BRIGHT! - hot pink, which leans towards orange, Mademoiselle is a lovely nude rose, and Rouge Orage is a soft blood-red.  I find the colours last three to four hours before they need a touch up.  There is a hint of the classic Chanel lipstick scent (which I happen to adore, but I know some people have a problem with scents), and they cover the lips perfectly in one swipe.

On the lips, Cambon:


Last time I swatched this, the pictures made it look rather too scarlet.  This is a much better representation of the colour, a hot, hot pink, with no real blue undertones.  A happy-making colour.

Mademoiselle:


This is the signature shade of the range, and possibly rightfully so.  I've seen a lot of swatches of this recently, and I think it's a very nice neutral, goes-with-anything colour and it seems to suit most people, though I've noticed it can look a fair bit redder on people with a lot of pink in their skin.  My hands are pinker than my face, and I've noticed the hand swatch is redder than the lip swatch as a result.  On my lips, however, it's a wonderful nude-shade.


I love this colour!  Haven't seem this one getting too much attention lately, but when I went on a mad swatching-frenzy in my local Debenhams recently (seriously, I got through a box of kleenex and half a bottle of their makeup remover, they hate me in there), this shade just called out to me.  It's a warm, but not too orange red, that's quite suitable for daytime wear.  It doesn't, in all honesty, look like anything out of the ordinary in the tube, dare I say it even looks a bit dull? But put this on skin, and it's beautiful.  It might just be my new favourite red, as it very wearable, and not too garish. Not as scary as it might look in the tube, well, I think so anyway.

Will you be trying any of the Rouge Cocos?  What's your favourite shade? Rouge Cocos are widely available now, and cost £21.
Share:

Thursday, 18 March 2010

My top ten brushes

Brushes
(Okay, it’s not actually going to be a top ten.  It’s not even going to be a top seven, as pictured, it’s a top eight – I’m a photographic-doofus, sorry!)

During Foundation Week recently, I mentioned my flat top kabuki brush a lot, and people on Twitter were asking me about my favourite makeup brushes as a result.  I’m not  a brush expert though, and many of my brushes are very, very old, but I do find myself reaching for a couple of classics over and over and over again.
In the same order as the picture:

brush 1

This is an old – a very old – MAC 218SE, a flat, animal-hair eye brush that is perfect for colour-washes.  It’s a very soft, silky feeling brush that grabs powder shadows well, and is great for blending.  I use this to add the base colour of whichever eyeshadow I’m wearing for the day (I tend to only use two different eyeshadow shades in most of my makeup looks).

Brush 2
This is a Benefit “Talent” brush, which is the one I use for applying cream eyeshadows.  It’s flat synthetic brush, which is a bit less “grabby” than the 218, it doesn’t pick up powders as well, but with a cream, it deposits a smooth veil of colour on the eyelid.  The rounded edge doubles up as an eyeliner brush, though it’s a bit wider than the eyeliner brushes I’ll talk about later.

brush 3
This is a very old Smashbox “pencil” or “bullet” brush, which I use entirely for defining the my eyelid crease, which is where I wear a darker shade in 80% of my own makeup looks. I find this technique makes my lids look less hooded.  Lots of companies make brushes like these now, but when I first got this one, around ten years ago, it was revolutionary!  This and the 218 are the two brushes I use on a daily basis almost without fail.

brush 4

This is the infamous flat-topped kabuki brush which is my latest obsession!  I received it in a swap from a lovely  US reader, and it’s had a centre spot in my collection ever since.  This one is from ELF, and it’s a round, densely packed brush, which is great for picking up liquids.  I put foundation on the back of my hand, dab the brush into the liquid, then “buff” it very gently into my skin.  I find it leaves an almost perfect airbrushed kind of effect when I use it.  I much prefer it to the flat “hard” foundation brushes (similar to the Benefit brush above, but larger), which I find can leave you a bit streaky.

It also works really well with powders – it’s a very soft synthetic, brush – and doesn’t leave you with a cake-y effect when you use it. I bought a back-up of this for powders.  For £3.50, this is a bargain!

brush 5

This is a MAC 266SE, which I find to be ideal as an eyeliner brush, in particular for using powder eyeshadows as eyeliners, which is something I do a great deal, to the extent that it’s a very rare day indeed when I use a pencil-eyeliner at all!  This brush is great because it’s fairly stiff, so it doesn’t splay when you press it against your eyelid, and unlike many cheaper versions, it’s thin enough that if you’re going for a very subtle thin liner effect you can do it.  I also use this for putting powder shadow on the waterline, which of course, I cannot possibly recommend anyone does, ever, but I do do it occasionally.  Allegedly.

brush 6
This is a MAC 224SE, which is a very soft, very fluffy synthetic brush that I use for blending.  Especially useful since I started using Urban Decay Primer Potion on a daily basis!  Doesn’t rub and tug your skin so much as using your fingers does.

brush 7
This is an ELF smudge brush, which has short, quite stiff (but yielding) synthetic bristles, it’s the most recent addition to my brush collection, and it’s one I like a great deal – in fact, it’s another one I have two of.  I use one for cream or gel eyeliners, I prefer it to the 266 for those, as there is less surface area for the product to dry out on as you’re applying them.  It’s also very good for tightlining, which is something I like to do to my upper lashes upon occasion.  I use the other one for cleaning up my cuticles after a messy manicure.  Again, excellent value from the people as ELF.

And last, but by no means least, my blush brush, which is a MAC 129SE (all my MAC brushes are special editions, I much prefer the shorter handles):

brush 8brush 9
It’s not the greatest blusher brush in the world, it’s slightly too scratchy, but it does give a nice soft finish to blush, when it’s applied.  Whenever you see me use Cargo illuminator, I’ve used this to apply it, as it doesn’t deposit the colour in clumps as some brushes can.  I also have a denser animal-hair brush from Smashbox, which gives heavier coverage, and as a result, I mainly use that one for contouring.  Which I don’t do often.

As for looking after my brushes, I tend to wash them with a brush cleanser or shampoo on a weekly/monthly basis depending on how often I’ve used them, and I give them a quick clean on a cleansing wipe immediately after using them on a daily basis.  My advice basically is to  spend whatever you’re happy to spend on brushes, (and if that’s nothing, then so be it! Make up is all about finding out what suits you, and that applies to application methods as much as colours and the like), but whatever brushes you have, look after them!  The vast majority of my brushes are around ten years old (some are even older, I have a Body shop brush here that’s got Barbara Daly’s signature on it!), but if it weren’t for the worn off numbers, and slightly chipped handles, you’d never know.

What are your favourite brushes?  What have I missed? What2 brushes do I absolutely need to make up my top ten?
Share:
© Get Lippie | All rights reserved.
Blogger Template by pipdig