Beauty Without Fuss

Popular Posts

Recent Posts

Wednesday, 25 June 2014

Nail Candy by Donnie & Ginny Greer (and introducing Emily!)

So, I'm always getting asked if people can do guest posts, but when you get waylayed by the birthday girl at her own party, begging to do nails for the blog, you can't really refuse, can you? So, without further ado, I present you the latest addition to the Get Lippie team, the gorgeous, the incomparable, the INCREDIBLY TALL, Emily Maben!

By Emily

I don’t actually remember agreeing to be ‘special nails correspondent’ for Get Lippie, it was my birthday and I’d had a few cocktails, natch. But I was delighted the following morning, with a suitably horrific hangover, to find a message confirming the beginning of my blogging career.

So…I’m Emily, and I’m going to be trying, testing and reviewing (and no doubt spilling all over my sofa and clothes) every nail product I can get my hands on, just for you. I don’t claim to be an expert…I have no training whatsoever, but have amassed a rather large collection of varnishes, tools, books, stickers and embellishments over the last few years and love experimenting with new techniques. Sometimes my attempts look like a hot mess, sometimes they look ace and I spend all day staring at my lovely SHINY nails.

As I MAY have mentioned, it was my birthday recently and my lovely team at work gave me this fabulous book: Nail Candy!


Written by Donnie & Ginny Geer, two sisters who started out as nail bloggers, this kitsch delight contains a wealth of nail art ideas and inspiration, with full instructions and clear images. I’d say some of the techniques are quite advanced, butwith a little bit of experience and the right tools I think everyone will find something to love here. Kitten nails with pointy ears (squeeee!), basic striping, dotting and half-moon techniques, artistic paint splatter effects and Harajuki style 3D cutesiness.


I decided to have a go at something simple and opted for the Watercolour manicure. Following their instructions I used two coats of Barry M Blueberry and let them fully dry, before roughly blobbing other shades of blue on top, with a little bit of silver for good measure. While the blobs are still wet you load of wide brush (I actually used an eye-shadow brush) with acetone and then you sort of smoosh the colours together to give a watery paint effect. Finally apply a top-coat and voila…erm, well a watercolour effect that I can’t work out if I like or not.


With a bit of practice (and perhaps better choice of colours) I think this could look fantastic. Have you tried this technique yet? How did you get on?


Emily. x

Share:

Tuesday, 24 June 2014

Anubis by Papillon Artisan Perfumes


By Laurin


Generally speaking, I’m quite happy to live in 2014. I do have the occasional fit of Mad Men-inspired melancholy, but although I’d be quite happy to have regular access to 60’s style hair and music, I’m decidedly less keen on 60’s style access to contraception and career opportunities. So despite its aesthetic deficiencies and frankly appalling lack of whiskey decanters in offices, I remain gladly in the 21st century.


What I’m not so keen on is much of modern perfumery. I rarely write about new releases, and that’s because they so rarely move me to any words beyond, “Eh…” To my mind, the word “modern” when applied to perfumery translates to “clean and bland”, or if we’re being polite, “minimalist and commercial”. Exceptions abound, of course: the Italian house Nu_Be pulls off the neat trick of crafting perfumes that are both interesting and easy to wear. No one would ever accuse Frederic Malle of playing it safe. And if all else fails, there’s always Mugler. But for the most part, I ain’t buying it.


That’s why I’m genuinely excited about the launch of three new scents from the nascent English brand Papillon ArtisanPerfumes.  Papillon is the baby of Elizabeth Moores, and its three debut fragrances are truly stunning creations. I’m obsessed with both Tobacco Rose and Anubis, and I struggled mightily to decide which to review first. Early bets are on Tobacco Rose being the best-seller, but the audacity of Anubis is too compelling to resist.


According to Egyptian mythology, Anubis was the jackal-headed god of the afterlife and was strongly associated with funeral rites and mummification. Liz tells me that she named the perfume after the ancient deity partially because it went through so many reincarnations before it was exactly right, but it is also worth noting that many of the materials in the composition would have been available in some form or another to the ancient Egyptians.


Smelling Anubis for the first time is akin to burying your face in a vintage suede handbag lined with silk. It envelops you in rich, dusty warmth that sings with anticipationAt first sniff, the bitterest orange peel note hangs in the air for a fleeting moment before seamlessly melting into a rich heart of rose,smoky Egyptian jasmine and pungent pink lotus. This is also where spicy immortelle and a medicinal, meditative frankincense Rivae show up and never quite fade, even as the fragrance dries down into saffron, buttery suede and an overdose of sandalwood. Anubis is striking in its originality, but easy to wear and never veers into the “rough-riding cowboy” territory of some of my favourite leathers such as Montale’s Aoud Cuir d’Arabie or my beloved Lonestar Memories. But what an act of bravery it is as part of a first collection! Commercially, I imagine it would have been a much easier sell to launch a sparkling citrus, or yet another fresh take on a white floral. And yet, here we have a dusty, erotic leather rendered in smoke and flesh. This is not a perfume for the masses. It’s a perfume for perfume lovers.


When I was eighteen years old, I saw the English Patient for the first time. Since 1997, I’ve probably clocked up another fifty viewings minimum. It’s still my model for what a healthy romantic relationship ought to be: passionate, furtive and in all likelihood, ending with fevered whispers in a remote cave. Anubis, for me, is the personification of Count Almásy’s weathered copy of Herodotus. After the plane crash, when the history is already between the pages and needs only silence and a willing pause to reveal itself. “Listen,” it says 


Papillon Artisan Perfumes launches its first collection of fragrances Anubis, Tobacco Rose and Angelique from June 24th at http://www.papillonperfumery.co.uk/. They will be available in Les Senteurs from early July, but you can get a sniff in the Seymour Place branch now. They’re worth the trip.

Share:

Friday, 20 June 2014

Estee Lauder Double Wear All-Day Glow


By Get Lippie

The BB cream craze (not to mention the CC/DD..ZZ/whatever creams) has largely passed Get Lippie by, to be honest.  After the first wave of original Korean BB creams hit the blogs, a bunch of brands leapt onto rebranding what had been rather lacklustre tinted moisturisers as BB creams, and I got totally fed up of the hyperbole, so I've been ignoring them.  I always said I wouldn't bother with BB creams until brands actually brought out new formulations instead of simply calling old products new names.  And so, after only about, what, three years or so?  Get Lippie is finally getting on the BBandwagon ...


So, what is a BB Cream then? :cough: well, basically, it is a tinted moisturiser, but it's meant to be one with high SPF coverage, and with definite skincare benefits, which is where a lot of the original "BB" creams lost me, as they were essentially cosmetic products rather than skincare.  You should be able to, in a pinch, wear your BB cream without a moisturiser underneath, and with many, you (or, rather, I should say, *I* simply can't).

Anyway, I've been trialling Estee Lauder's Double Wear All-Day Glow, which is their first BB-Cream from their best-selling Double Wear line for quite a while now, and I really like it.  As you can see from the above, it's quite a thick formulation, but it spreads well over the skin.


Compared to some other BB creams on the market, this is quite highly pigmented, which is what I like about it.  Mind, Double Wear is known for its longevity, and it's nice to report that the All-Day Glow lasts very well too.  It has a slight powdery finish on the skin, but it has great light-to-medium coverage which is very buildable.


My hands are fairer than my face, for some reason, so, whilst this looks a bit yellow on my hand there, it's a great match to my face, and the slight yellow tone does a good job of balancing out my red patches.


Blended out, this has slightly less of a dewy finish than I expected from the name, but this means it needs little, if anything in the way of powder, which is handy! This is Intensity 2.0, but the range has 8 shades in total, I'd probably prefer Intensity 1.0 for winter, but as a summery coverup Intensity 2.0 works well for me.

Lasting power is very good owing to the slightly more opaque than a normal BB, I get 8-10 hours out of this.  If it's a very hot day, I may need to powder down slightly in the late afternoon, but that's only to be expected.  As a summer alternative to the original Double Wear foundation, this is great, lighter and sheerer than the original formulation, and more glowy than Double Wear Light, it's a lovely formulation.  It costs £29 from leading department stores.


The Fine Print: PR Sample - Photos for this post were taken with a Nokia Lumia 1020 lent by Microsoft.

This post: Estee Lauder Double Wear All-Day Glow originated at: Get Lippie All rights reserved. If you are not reading this post at Get Lippie, then this content has been stolen by a scraper


Share:

Thursday, 19 June 2014

How to do Concealer


By Luke

Picture this: You’re sat round a dinner table and someone asks what it is that you do, so you tell them, and they immediately throw their hands over their face, and whimper “don’t look at me!!”. Does that happen to you? No? Well, to me it does. This is normally followed by a whole slew of questions, a beckoning of girlfriends, and that staple favourite question of straight men to makeup artists: “so do you do drag?”

I don’t mind this (save for the drag question), I am quite happy to talk makeup and skincare, depending on the location (funerals not so much) imagine staring into open casket and “well we think mother’s best feature was her lips so if you could just emphasise that....”

However, one of the things I get asked about by far the most is concealer. This is closely followed by foundation, but I’ll cover that in a later post. It seems that concealer is a bit of a mystery for a lot of people. Where do you put it? How do you put it on? Which concealers actually, you know, conceal?  The fact is that there are a ton of concealers out there, but very few are actually doing a good job of ‘concealing’, or even staying put. So, let me take you through what I use nearly every day of my working life. After 15 odd years of painting faces, I believe I have finally nailed this concealer lark.

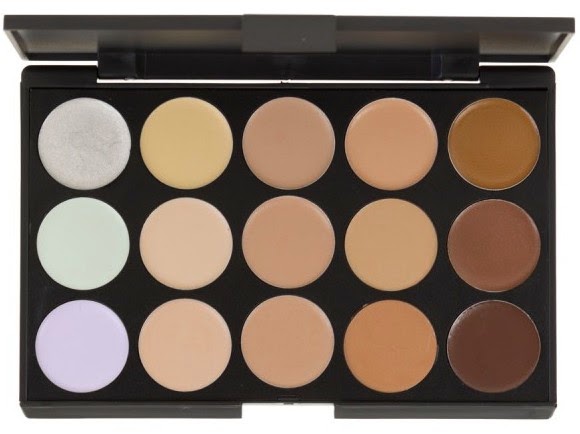
First off the bat, there are a gazillion different textures of concealer. Solid, creamy, waxy, et al, and there are different textures for different things. As a very general rule:
  • Solid/waxy (palette) are for the face. They warm up and cool down with your face so don’t move.
  • Creamy/liquid (wand/pot) are for under the eye. Nourishing, and more flexible for that sensitive area.
If it’s a spot, or the odd blemish, the more yellow the concealer is, the better it will be at covering that angry red look. Redness is really what you are trying to diminish here. No concealer, no matter how opaque will ‘get rid’ of the bump or the texture. Just get rid of the colour. No bags will be got rid of unfortunately.

Face – How to use it
  • A good synthetic brush for smaller areas is perfect. Synthetic because it doesn’t absorb any of the product.
  • Only cover the area that NEEDS covering, and not muller it so that you end up with this huge blob of concealer screaming at you from your otherwise perfect face.
  • Dot just over the bit that you want to cover, and pat it in.
  • Set with a tiny bit of a fine face powder.
  • For larger areas, use a fluffy brush that will have an ‘airbrush’ effect over the area.
  • Concealer will pretty much ALWAYS go on AFTER your base. If it goes on before you are likely to rub it all off again.


Laura Mercier Secret Camouflage. £26. Multi award winning, and been around for a good 14 years or so for a reason. There are few that top this in terms if it’s ability to cover, and actually value for money. It’s divided into two tones, and this on first glance can be a little confusing. The reason for this is that there are no two places on the face that are the same colour so it gives you the control over the colour and tine to match where exactly you are trying to cover. I appreciate that this ‘mix your own’ method can appear to be a bit of a faff, but in actual fact, it is incredibly effective, and well worth spending that little bit of extra time to get it covered.


Louise Young have a similar concept that is also excellent. Three tonal concealers that are designed for the face, AND the under eye areas. Again, you may need to have a play around and mix to get the exact colour, and correct tone, but at £20 AND a brush included you really can’t beat these for value.

For under the eyes, it would be advisable to find one that is probably about 60 -70% opaque rather than total coverage. It doesn’t look terribly natural, and also is more likely to look heavy and obvious.


The trick with undereyes is to get rid of that blue/grey area right from the corner of your eye, on the side of your nose, to about ¾ of the way under your eye. Pasting concealer all the way along the undereye area is a bit of a waste to be honest. The other trick is to use enough to actually cover. I often see people putting an amount so small on that there is absolutely no benefit whatsoever. Don’t fear it!


A fair amount is fine, and if it’s too much keep patting it until it looks as close to your natural undereye as possible. It’s only make up, it does come off. Be bold with it! The best I have used are Clinique’s Airbrush concealer. A handy little pen with a brush in several colours that are perfect for almost all skin tones. It also has some radiance to it that brightens in a very subtle way. Not ideal for the face, but excellent coverage.


The other one I absolutely love is the NARS Radiant Creamy Concealer. In a wand so super easy to use the coverage on these are mighty, and the finish is just superb! Only a tiny little bit is needed.


Tools

These are very important. Here is a section of some of my favourite concealer brushes for under eye, and for the face. It isn’t really good enough to use your finger, tempting though it is as a) not terribly hygienic for your undereye area, and b) you do not want a honking great finger print in your concealer.


Going from top to bottom


  • Glamcor Mini Finish brush. A great mixture of natural and synthetic hair to ‘airbrush’ concealer on. Great for under eyes, and also great for buffing in a little concealer on the face. (Available from www.preciousaboutmakeup.com)
  • Laura Mercier Secret Camouflage Brush. Cut small, and to a point so the flat edge of the brush can get a fair amount under the eye, and the point of the brush can be used to get a precise dot over the area you are trying to cover on the face.
  • M.A.C 219 brush. SUPER fine for those really tiny areas of coverage. Tiny veins, and small blemishes, this puts the concealer on almost imperceptibly. Takes a little time, but well wirth the effort.
  • Glamcor Mini Contour. Slightly fatter, and purely synthetic for a full coverage finish on larger areas. Good for scar discoloration and also darer points of birthmarks etc...
  • Finally, there is absolutely no need to spend out on special brush cleaner. I have and continue to use a good antibacterial washing up liquid (fairy for some reason seems to work best for me) for all my synthetic brushes, as it’s excellent at removing grease. All of it.

The Fine Print: These are all items from my professional kit.

This post: How to do Concealer originated at: Get Lippie All rights reserved. If you are not reading this post at Get Lippie, then this content has been stolen by a scraper
Share:

Wednesday, 18 June 2014

Spob O’Brian on Make-up Through the Ages

By Tindara
 Those of you who went to any of the Selfridges Beauty Project events will be sorry to hear that it’s now all over. The Get Lippie team had a great time and we decided to finish off our Beauty Project experience with a fascinating talk by Spob O’ Brian, Head Of Professional Development at Illamasqua, on Make-up Through the Ages. Spob is thoroughly engaging and very knowledgeable about the history of make-up. She went from the Egyptians covering themselves in ochre and clay, to World War II propaganda featuring red-lipped rosy-cheeked land girls. Like a lot of self-respecting beauty geeks I’m fascinated with this subject, and wanted to share some of the most interesting info that Spob imparted.

A lot of historical lotions and potions are remarkably similar in purpose to those we currently use. The earliest evidence of cosmetics were in ancient Egypt where handmaidens were only allowed to eat certain herbs and fruits as their saliva would be used in the mixing processes. Tomb paintings show Egyptian men and women sporting different coloured skin coverings made of clay, ochre, spit and oil, which protected them from the sun as well as making them look good; a mixture of the foundation and sunscreen that we use today. I hope Cleopatra washed it all off before the asses milk bathing. I’m now imagining her sitting in a bath of something resembling my cup of Twinings Everyday. Her skin must’ve been lovely and soft from all the clay and oils; it’s not so different from the kind of treatment you’d have at a spa, and it sounds like something that men would have taken part in too.


Egyptians also lined their eyes and brows heavily in black, with what we now know as kohl. And I bet you didn’t realise that in Ancient Egypt and Greece the mono-brow was highly prized. Why do we spend all this time plucking, and threading, eh? Or that there was a language of beauty spots in the 18th century when people used small pieces or fur or fabric to cover their smallpox scars. The placement would denote whether you were feeling coquettish or flirty. This could be fun. I dare you to use La passionnée pictured above for work tomorrow.

Of course, not all of it was so fun, the use of lead make-up from Ancient Rome to Elizabethan England led to lead poisoning and disease, but it was years later in 1873 when the production of theatrical greasepaint would lead to the first lead free make-up being made for the general public. Greasepaint was much harder work than current formulations and needed to be melted over candles in spoons before it could be used.


Spob pointed to women getting the vote in 1918 and the beginnings of cinema as the start of a period of greater self-expression and experimentation for women, as well as the beginning of the industry as we recognise it today. Further development came about as a result of WWII due to the market for camouflage after injury, and nail polish came about as a result of the car industry. Yes that’s right, the Opi and Essie stuff you paint your nails with was conceived as a result of spray paint for cars.
It’s a fascinating history and there’s a distinct correlation between Egyptian handmaidens and the red carpet make-up artists for A-listers today. I really want Spob to write a book about all this, when looking for information on this kind of historical detail, there really isn’t much out there. If she does a talk or event in the future I would urge you to go. You’ll love it. I’m off to paint beauty spots all over my face and mix my own mud packs.

This post: Spob O’Brian on Make-up Through the Ages originated at: Get Lippie All rights reserved. If you are not reading this post at Get Lippie, then this content has been stolen by a scraper
Share:
© Get Lippie | All rights reserved.
Blogger Template by pipdig