Beauty Without Fuss

Popular Posts

Recent Posts

Monday 7 December 2009

Review - Clarins Wonder Perfect Mascara

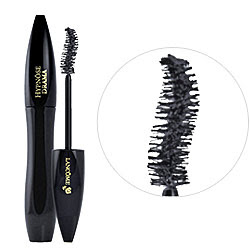
I love mascara.  Specifically, I love Lancome Hypnose, and Lancome Hypnose Drama (though the brush on that one drives me a bit bonkers, if I'm being really honest), I've tried other mascaras, but for me, nothing really comes close.

Clarins recently ran a giveaway on their Facebook page, and I was lucky enough to win a sample sized tube, and, I have to say, it's been the only mascara I've used since (I've toyed with Smashbox DNA which is going in the bin, and Max Factor Lash Extension, which I think is a bit rubbish as well) because, well, it delivers.

Here's what Clarins say:

"A multi-dimensional, 3-in-1 mascara, that ensures oversized volume, curl and length, with an instant and intense effect. From the first brush stroke, lashes are coated from root to tip with smooth, even, deeply pigmented colour and a beautiful lash look.
3-in-1 capabilities to ensure impressive volume, length and curl.
- Incredibly thick, volumized lashes, perfectly separated, no clumping.
- Infinitely long lashes, highlighted along their base by a superb eyeliner effect.

- Lashes with a spectacular curl that always remain supple."

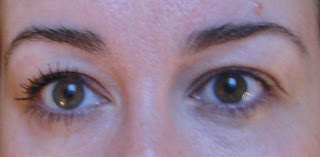
And here's how it looks as compared to my natural lashes (one coat):


As you can see, the lashes on the left there are definitely longer and thicker.  After I add the mascara to the other eye (I'm not wearing any makeup in these pics whatsoever, aside from the mascara) here's how they look:


I think the product actually delivers on all three claims, which is beyond amazing, and compared to the Lancome (which has been my Holy Grail mascara since the first time I ever tried it) it doesn't flake or run after about six hours, which has long been a failing of the Lancome though I've been loathe to admit it ...

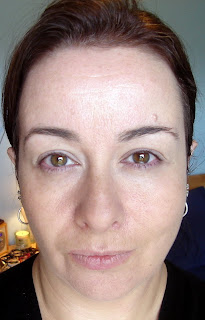
I like what this mascara does for my eyes so much that recently it's been the only makeup I've worn besides some lip balm, which, a few years ago would have been simply unthinkable, it's amazing that a mascara can in itself convince me not to wear eyeliner! I also think it's down to being happy with what my new skin care routine is doing for me, and I'll be blogging about that in a bit more detail later on in the week.

What's your Holy Grail Mascara?  What would make you change products?
Share:

Sunday 15 November 2009

The week ahead ...


Have just hit 77 followers, thank you so much lovely people!  This means there will be TWO prizes in my giveaway, which you can find here: Great Giveaway Unveiling. Your chances of winning have just doubled, so if you haven't entered yet, why not? ;)

Coming up this week: Lancome and Rimmel foundation reviews, Lip of the Day featuring NARS, the second part of my eye makeup remover challenge, Organic Wednesday featuring Dr Organic, as well as announcing the giveaway winner on Thursday!


Organic Pharmacy are having a shopping event in all their branches on Thursday 19th too,  I'll be popping along to that, so I can sample their wares properly!  I've always been intrigued by their products, so I'm thinking this will be a good way to find out more about them, they're promising discounts and mini-treatments (you know I'm a sucker for a mini-anything!) so I'm looking forward to getting my sticky fingers into their organic cosmetic range ... see you there?

Have a lovely week!
Share:

Makeover: Anna

Another Sunday, another makeover ... please meet Anna:


Anna came to me a couple of weeks ago, wanting to look more polished, and also to see how to create a smokey eye that would suit her beautiful grey-green eyes.  We decided on a neutral brown palette from Pixi to create the look around - I can't read the name on the packaging anymore, sorry - and I thought keeping the focus on those lovely eyes was definitely the way forward.

First things first, as always, we start with creating the perfect base.  Anna has some red marks, and a few pigmentation issues, so a foundation that could double up as a concealer was ideal.  I chose Benefit Play Stick foundation in Jax.  I really like these foundation sticks as they're really versatile, and you can amuse yourself painting pictures on your face before you blend them in! (Yes, I am a child).  We dotted a little extra over the problem areas,  blended well, then finished with a layer of Benefit Bluffdust to even out the complexion.  Here's how it looked after:


Already a little more polished! From the eyeshadow palette below, I used shade two as a colour wash all over the lid, and used shade 1 as a brow highlight (this is a well loved and much abused palette, so please forgive how it looks!):


I thought these colours worked really well on their own and would be suitable for a pretty and polished day time look with just a touch of mascara.  Anna wanted something a little more defined however, so I went on and used shade 3 to add some contour definition, and shade 4 as a liner:


Then, of course, it was time for mascara, we added a layer of Lancome Hypnose, and it really made her eyes stand out:


After this, we added blush (MAC Blushbaby) and a tiny slick of lipgloss (Prescriptives Stellar) and the look was finished:


Polished, subtle, slightly smokey, and really lovely.  Here's the before and afters:


Still waiting to hear how the date went, Anna!


Share:

Wednesday 7 October 2009

Face of the Week

I'm a very lazy person, and i appear to be addicted to routine at the moment, so whatever makeup I find myself wearing on a Monday is what I tend to find myself wearing for the next few days! Here's the products I've been wearing this week, it's very plain and simple, but quick, and pretty.


Organic Surge Blissful Daily Moisturiser (which I'm trialling for a blog post later this week)
Benefit Bluffdust - which I love for dealing with my red patches!
L'Oreal Studio Secrets foundation in Gold Ivory
Chanel blusher in Rose Defile
Urban Decay Primer Potion (depotted)
Bare Escentuals Glimpse e/s in Bravo
MAC kohl pencil in Feline (inner upper eyelid only - have I mentioned how much I love that look, and this eyeliner? Well, I do!)
Lancome Hypnose Drama in Black (of course!)
and the look is finished off with a tiny slick of Bare Escentuals Buxom lipgloss in Brandi.

Pictures of the finished look will appear tomorrow ...
Share:

Sunday 27 September 2009

Makeover: Sharon Pt 1

We're going to do the makeover in two parts today - you'll see why when part two is posted later ...

Meet Sharon:


Sharon is another friend of mine who has volunteered for a makeover. Whilst chatting about how she'd like to look, she had two requests, firstly, she wanted a nice, simple, polished look suitable for interviews and everyday wear.  The second we'll talk about in part two.  As you can see, Sharon has beautiful porcelain skin,  amazing cheekbones, and enormous eyes, realistically, Sharon doesn't need a huge amount of makeup to make the most of those features, so we worked with only three or four products.

First of all, foundation.  As I mentioned earlier, Sharon has lovely creamy skin, so we didn't need much in the way of coverage.  I used a very light layer of Max Factor Seamless foundation, and only used it in those areas where Sharon is prone to a bit of high colour - around the nose, and a little on her cheeks.


As you can see, this has evened out her skintone just a little, and left us with a good base to work from.  Sharon's eyes are bicoloured - she has one of grey, and one of blue - so, I played around with a bluish-grey colour wash to make the most of what I think is a most distinctive - and lovely - feature.


Here, I've used Calvin Klein shadow in Granite, just the one shade all over the lid, darker towards the lash line, and blended in more towards the socket line.

Once this was in place, we finished with a touch of the same shadow under the lower lashes as a liner, then a light coat of Lancome Hypnose on the lashes, and Clinique Almost Lipstick in Sheer Blackberry, here's how it looked:


So there you go, polished, pretty, and suitable for any business occasion.

However, Sharon also wanted a dramatic - and I do mean dramatic - look for a Ball she's going to in a few weeks.  I'll be posting the details of that one very shortly.

Click here for part two ...


Share:

Friday 25 September 2009

Eye of the Day - Updated!

So, I decided that yesterday's picture of my eyemakeup wasn't the clearest, so I've redone it:


And here it is with the Urban Decay eyeliner in Ecstasy more clearly visible:


A cheery look for a Friday me thinks.

Products used:
MAC Paint - Untitled (as base)
MAC Dovefeather in the inner corner
by Terry Black Grape in the outer corner
Urban Decay liquid liner in Ecstasy
Lancome Hypnose Drama one coat.
Share:

Saturday 12 September 2009

Review - Eyeshadow Primers

Today, I've decided to to a side-by-side product test. Two of my all time favourite products are MAC Paint (which I use as an eyeshadow primer, as well as a colour) and Urban Decay Eyeshadow primer. Up until now, I'd be hard pressed to say which was better, so I'm trying them both out at the same time, with an eyeshadow that I already now disappears in the blink of an eye ... so here goes:

WARNING: This post will contain pictures of me without makeup.

Stage one: In which our blogger goes barefaced

At this stage, what I mainly notice is that I've neglected to groom my eyebrows, no matter, won't be making that mistake again! What I also notice is that the MAC Paint on my right eye (left on these pics) reflects the light a little more than the Urban Decay primer on the left eye (right in these pics), I think this is because there is a little hint of shimmer and pigment in the MAC, which the UD is missing.

Stage Two: Wherein the experiment begins in earnest


At this stage, with both eyes open, there is little difference, but with my eyes closed, you can see that the UD primer is definitely better at grabbing the pigment, and the colour is truer. I'm using a loose shadow from Bare Essentials (Smoked Clay), which is a nice greenish grey, but that's hard to pick up with your brush. However, there is a price to pay for this extra pigment being visible, as you'll see in the next stage.

Stage Three: Wherein the colour deepens

I thought that the shadow I was using was too wishy-washy in the first pics, so decided to go for another layer of colour. When applying this, I realise that the Urban Decay is damned difficult to blend over. In fact, it's damn near impossible to blend over after it's had a chance to set for a minute or two. This means that there is a visible line in my socket-crease on my left eye (on the right there), which I'm finding infuriating. Blending is important, vitally important, to any good make up, and the Urban Decay simply won't let you do it.

Stage Four: In which my mascara is uneven.


Here, I've finished adding my eyeliner, and just wanted to see what the difference was between no mascara and one layer of Hypnose Drama (upper, pic) and with two layers of mascara (lower). What it has done is highlighted the fact that I have thicker lashes on my right eye, but longer lashes on my left. I'll be sticking with one coat from now on, I think.

Stage five : in which the finishing touches are revealed

I got around to powdering, adding blush and putting on some lipstick (Ellis Faas in L307, a lovely glossy coral shade) but not fixing that damn eyebrow. That's obviously why I'm looking so unhappy.

Stage six: In which your blogger fixes her hair, and her expression
There we go, I've covered up my pointy spock-ears, and am feeling more human again.

Verdict:

At the moment, they're fairly evenly matched. Whilst you do get a better coverage, and colour trueness with the Urban Decay, this is outweighed with the MAC Paint being easier to blend with. Now, I'm going to see how this look lasts throughout the day, and report back.

Products used:
Urban Decay Eyeshadow Primer
MAC Paint in Untitled
Bare Essentials powder shadow in Smoked Clay
Revlon Wet/Dry Liner in Chocolate
Lancome Hypnose Drama in Black
Bare Essentials Blusher in Poppy
Benefit Bluff Dust face powder
Ellis Faas Glossy Lip in L307
Share:

Thursday 3 September 2009

Product Review - Lancome Hypnose Drama


I am a massive fan of Hypnose, I've used it constantly for years. Well, I say constantly, I've had occasional flirtations with Max Factor, and Benefit Bad Gal once in a while, but I always come back to Hypnose. I found it's lengthening and fattening properties to be second to none.

But ... I've always liked the original Hypnose, Lancome attempted to improve the original a couple of years back with an "Onyx" version, which I really didn't like at all. It was supposed to sparkle, and leave your lashes glossy with a shine that was meant to be visible to all. It didn't do any of those things, that I could see. It was just a slightly runnier version of the original formulation, and it dried out very quickly after only a few uses.

So, when I discovered Lancome had reformulated yet again, I was exceedingly sceptical, especially when I noticed it has a curved brush. I am notoriously cack-handed at the best of times, and to be honest, I've never really seen the point of these curved brushes. But I gave it a go anyway ...

And, I'm very glad I did, setting aside that I still don't entirely see the point of the curved brush, it's a very good update to the formula. It lengthens, and thickens even better than the original formulation, and, most importantly, it lasts better too. Some of my friends complained that the original used to flake, I never had that problem, but it didn't wear well much after about six or seven hours on me, I used to notice.

The Orange-Faced Lady on the Lancome counter said you could layer up to 12 coats, but I think that way madness lies. I notice a massive difference after just one coat, and two coats is more than enough for anyone, I would have thought.

So all in all, this is an excellent addition to the already superlative mascara range from Lancome, I'm a complete convert.

Pics of lashes to follow ,,,
Share:
© Get Lippie | All rights reserved.
Blogger Template by pipdig