Beauty Without Fuss

Popular Posts

Recent Posts

Wednesday 25 September 2013

Reiss Grey Flower Eau de Parfum


I don't go to Reiss very often.  Well, ever, let's face it, but now they've released a fragrance, at least there will be something in the shop that'll fit me these days ... anyhoo, I was very surprised when I first sniffed Grey Flower released by the brand in association with Azi Glasser, I'd been expecting some fizzy, flowery, sugary syrup designed to appeal to the lowest common denominator with the simple aim of being as innoffensive as possible in order to maximise sales.

I was wrong.

Grey Flower is an amazing fragrance to be launched by a high street store, and from the slightly medicinal (almost oud-like) opening, to the challengingly prickly and spicy wood base, it feels decidedly "niche" to the nose, and I was expecting a higher price point than £49 after I smelled it, too.  This smells expensive and intriguing, and not like anything else for the money.  The formulation also contains pimento berry, frankincense and amber, and the nose-tinglingly spicy woody base is sequoia wood. There is not a flower, or a stewed fruit nor a even the slightest hint of candyfloss in sight. It's a deep golden-seeming fragrance, making the perfume rather peculiarly named ...

It's dry, spicy, and rather unusual, I genuinely can't think of anything else (that I've experienced) that it smells like, and it's rather marvellous for that.  Whether the average perfume customer will appreciate it is another matter, however, and I look forward to finding out the first set of sales figures.  Oh, and I bet the first flanker is a whole bunch more conventional ...

The Fine Print: PR Sample

This post: Reiss Grey Flower Eau de Parfum originated at: Get Lippie All rights reserved. If you are not reading this post at Get Lippie, then this content has been stolen by a scraper
Share:

Tuesday 24 September 2013

Ellie Saab Le Parfum - Eau de Parfum Intense


This is the second flanker to the original Ellie Saab le Parfum, which was released in 2011, the original was, I found, a rather sweet and diaphanous orange blossom and honey fragrance.  I liked it, but it always felt rather "thin" to me, and whilst I do wear it once in a while, I don't adore it as some people do.

In 2012, they released an Eau de Toilette version (which I haven't smelled in all honesty), and that was supposed to evoke a fresh Meditterannean morning to the original's warm midday, and in 2013 they've finally released an "evening" version of the fragrance which is deeper, richer and more intense in almost every conceivable way.

Where the original fizzes on first spraying with bright light citrus, Intense sets its stall out early with an intriguing and heady - intensely heady - burst of orange blossom and rather animalistic honey, letting you know right away that this isn't some flighty little wisp of a fragrance that'll disappear after an hour or so.  Whereas the original finally settles into a powdery blossom fragrance, there's a meaty and distinct amber at the bottom of Intense, which is warmer and more intimate than the EDP.  

I find it a fragrance perfectly designed for the evenings, and I think it'd be a great "date night" fragrance, it seems designed almost to make people want to get closer to you to smell it more. It lasts well, and surprisingly for such a deep fragrance, it sticks close to the skin, having only a rather modest sillage. It's a thick and intense scent, but it also has a hint of playfulness not usually seen in "intense" fragrances, and I think that's down to sparkle of the blossoms used.  It's also, of course, down to the talents of Francis Kurkdjan, who is fast becoming the favourite perfumer of this particular blogger. 

30mls of Ellie Saab le Parfum Eau de Parfum Intense will cost around £40, which is a bargain. 

The Fine Print: PR Sample 

This post: Ellie Saab Le Parfum - Eau de Parfum Intense originated at: Get Lippie All rights reserved. If you are not reading this post at Get Lippie, then this content has been stolen by a scraper
Share:

Monday 23 September 2013

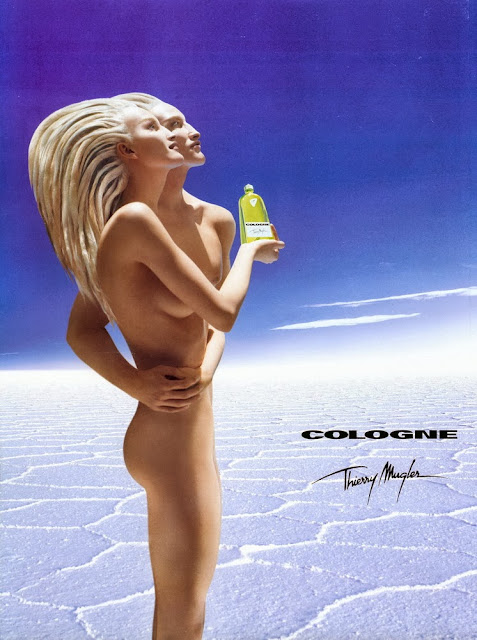
Mugler Cologne by Thierry Mugler


I'm in a funny kind of limbo at the moment, summer is most definitely over, autumn is well under way, winter is approaching on the horizon, and yet here I am preparing for my "summer" holidays.  We delayed our honeymoon quite considerably (the wedding was in February), and there's still the best part of two months before we go away, so I  have a kind of odd reluctance to part with my summer scents, not to mention the clothes!  Mugler Cologne, like so many cologne-scents is perfect for summer, (and it's the fragrance I'm taking with me on my honeymoon as a result) but how insane is that ad above?  I keep looking it and screaming "WHY ARE THERE ONLY THREE ARMS? WHERE'S THE OTHER ARM, THIERRY????", only, you know, inside my head, I'm not insane.


Mugler Cologne is fresh and slightly bitter, clean-scented with hints of laundry-musks, orange blossoms and herbs, it's about the most mainstream fragrance from the Mugler line (if you ignore Angel, that is.  Let's face it, Angel is, essentially, in a league of its own, let's face it). Certainly, it's the easiest Mugler fragrance to wear, no candyfloss (Angel), no space-jasmine (Alien), no caviar and creamy grapefruit (Womanity) and no strange hallucinations of giant Twixes wandering around your flat as on those occasions when MrLippie wears A*men.  Mugler Cologne is simple, free and easy almost.

It is very, very green-smelling, and it's quite difficult to pull out the different scents on the skin whilst you're wearing it, but there are hints of grassy vetiver, and lots of beautiful orange blossom, and I think I can detect something a little creamy, and possibly salty deep down, close to the skin.  It's crisply refreshing, and I'm hoping it'll be the perfect accompaniment to my tropical winter holiday.  It lasts about as long as you'd expect an eau de toilette to, which isn't very long at all, but it's a big bottle and constant reapplications aren't the worst thing in the world.  Sillage is moderate, so you won't be gassing anyone by reapplying, either.

Best of all, it's only £31 per 100ml in Debenhams, and the matching hair & shower gel is £17.  That's about half the price of a similar cologne from Guerlain and - get this - it's a seventh of the price of the same size bottle of Tom Ford Neroli Portofino ...

The Fine Print: The fragrance was a PR sample, but I've been and bought the bathing products as a result of the sample ...

This post: Mugler Cologne by Thierry Mugler originated at: Get Lippie All rights reserved. If you are not reading this post at Get Lippie, then this content has been stolen by a scraper
Share:

Friday 20 September 2013

Guest Post by Kitty at Not A Nose - Home Keratin Treatment 2

A month ago I tested this kit that I purchased on Amazon http://www.amazon.co.uk/Brazilian-Straightening-Blow-Dry-Keratin-Treatment/dp/B003YUEF7C and wrote about it for Get Lippie. So how is it now?
Well, the super-straight wore off after a week, so I’m left with hair that looks more like ‘my’ hair, but more under control. This photo is my hair the day after I left it to dry naturally. As you can see the wave has returned but it isn’t as frizzy.


I’ve noticed lots of positives about the treatment:-
  • My hair does not frizz up as quickly, normally the day after washing my hair just starts getting bigger and fuzzier (see the last picture on this post for an example http://getlippie.blogspot.co.uk/2011/11/guest-post-charles-worthington-straigh.html)
  • I don’t suffer from terrible helmet hair after I’ve been horseriding, and I now dare return to the office after sneaking off for a lunchtime lesson, rather than having to hide my bad, sweaty hair shame at home.
  • When I can be bothered to straighten it, the process feels a lot quicker.
  • It seems to suffer from humidity based frizzing less. So I went on a drizzly night after straightening my hair, and it stayed straight the whole night.

Negatives of the treatment:-
  • It slightly limits your choice of shampoo and conditioner, as you have to avoid Sodium Chloride.
  • It takes quite a while to apply, but in some ways you’re spending 1.5 hours on one night to save you lots of little bits of time over the subsequent month.

Will I be doing this kit again? Hell yes! (and not just because I’ve got half a jar left!) I’ve liked having better than normal hair for a month, and I can only hope it keeps going for another month.

You can find more writing by Kitty at http://notanose.wordpress.com/


This post: Guest Post by Kitty at Not A Nose - Home Keratin Treatment 2 originated at: Get Lippie All rights reserved. If you are not reading this post at Get Lippie, then this content has been stolen by a scraper
Share:

Thursday 19 September 2013

Guest Post By Hair Advice and All Things Nice - How To be Victorious in Voluminous Hair


Getting volume in our hair that stays put and doesn’t fall flat is something most of us struggle with. Too much backcombing and you look like a birds nest, too little and you’re left with limp locks. Read on for some hair-boosting advice and a few product recommendations.

Good volume is all about the prep. Go for a volumising shampoo (Redken Body Full is great!) and avoid using conditioner on roots; this tends to weigh hair down. Concentrate on the ends to help hair look big without sacrificing the condition. Using a mousse or spray pre blowdry will with styling and avoid using too much product to finish as this can weigh hair down. A light spritz of hairspray should do the trick.
If you can’t give yourself a salon quality blow dry yourself without getting in a tangle, use Velcro rollers to give hair added lift. Simply blow dry as normal then pop some large rollers in the top section of hair (crown and parting) and blow dry on a low setting for a couple of minutes. Leave to cool completely and don’t take out until you are just about to walk out there door. 

There are tons of hair products on the market that promise to boost our hair but luckily I’ve tested and trailed most of them and have found a couple of gems that will hopefully make your hair look so big, people will ask if it’s full of secrets.
  1. Lee Stafford Double Blow Mousse – this stuff is great for creating volume and comes with the signature scent
  2. Oribe Dry Texturising Spray – whilst a little pricey, this stuff delivers volume without the product feel to hair, great for those with fine tresses
  3. Indola Innova Volumising Powder – this little tub of hair texturising powder works wonders sprinkled along roots.
  4. Ojon Volume Advance Shampoo & Conditioner – this will give hair a volume kick and can also help make it stronger and thicker thanks to high protein ingredients.
  5. Boar Bristle Backcombing Brush – you can pick these up from any good salon supply store. Use the fine point end to section hair, and tease from underneath to get instant volume.
You can read more from the lovely Kelly at http://www.klghairadvice.com/


This post: originated at: Get Lippie All rights reserved. If you are not reading this post at Get Lippie, then this content has been stolen by a scraper
Share:

Wednesday 18 September 2013

Guest Post by Kitty at Not A Nose - Home Keratin Treatment

My dream is to have low-maintenance hair, and I’ve tried other straightening treatments to achieve this (http://getlippie.blogspot.com/2011/11/guest-post-charles-worthington-straigh.html) with limited success. This is my hair on a good hair day – it’s wavy, thick and quite coarse. It only looks this good in the photo thanks to the conditioning spray that I liberally applied before letting it air dry. The waves will turn into frizz by the next morning, and no amount of spray or scrunching will get them back. If I straighten it, it pretty much inhales humidity and becomes really big and scruffy within a day.

[picture 1]

I’m trying this Brazilian Keratin kit that I purchased on Amazon http://www.amazon.co.uk/Brazilian-Straightening-Blow-Dry-Keratin-Treatment/dp/B003YUEF7C . It contains everything you need to carry out the treatment apart from a hair dryer and straighteners. Unfortunately it did come with those horrible disposable gloves that are stuck onto the paper. These always remind me of lobster claws and they always end up letting stuff run down your arm into the glove.


The instructions supplied were pretty clear with the step by step process described, and a page of FAQ. The instructions advise a patch test for 48 hours before applying the kit. You MUST do this. In the Amazon reviews there are people complaining about reactions to the product, and as the product will be left on your hair for 48 hours you do need to be certain it won’t cause you any problems.

So – down to the process. All in all this took me about 1.5 hours, if you have a friend to help it probably will take less time.

Step 1: Wash your hair with the supplied clarifying shampoo. Comb your hair first as this shampoo left my hair quite tangled and hard to comb.

Step 2: Blow dry your hair on medium heat.

Step 3: Put on the gloves, section up your hair and use the brush to apply the product. I wasn’t actually sure how much product I should use, in the end I’d used half of pot on my relatively short hair. The product doesn’t smell too bad at this stage, a bit sugary sweet. Help from a friend at this stage would be useful, I had to use 2 mirrors and a lot of uncoordinated hand waving to apply it to the back. Comb through the product just in case you’ve missed a bit.

Step 4: Blow dry your hair straight on medium heat. Hooooo boy! Now the product smells like I’ve fallen into a vat of toxic crème caramel. This stage really has to be done in a well ventilated room, by the end of it my eyes were streaming. It also seemed to take a lot of drying, at one point I was really thinking it wasn’t going to dry at all. At the end of this stage my hair felt a bit ‘claggy’ as if I’d applied too much mousse/product.

Step 5: Straighten your hair with hot irons, going over each section up to 7 times. Use a comb to hold your hair while you do this as the hair will get mighty hot. The smell was still there, but not as eye-wateringly powerful, and my hair didn’t feel sticky any more.

And here is the finished result. It looks pretty flat and straight doesn’t it?


Now I am into the RULES

Rules for first 48 hours until you can wash your hair for the first time (you can leave it longer if you want and if you’re a dirty mare like me)
  • Keep your hair dry, if it does get wet, blow dry and straighten.
  • do not tie your hair up, push it behind your ears or kink it in any way.
  • Re-straighten your hair if any kinks develop .
  • don’t feed it after midnight.
  • Avoid hair products that contain salt (sodium chloride) as it shortens the lifespan of the treatment. It can be found in shampoo, conditioner and non-obvious products like heat protection spray.

I used Tresemme Naturals shampoo and conditioner, but you can buy specialist salt free shampoos on Amazon.

I ended up leaving it 72 hours before washing my hair due to general laziness, I didn’t find the treatment left it greasy. I washed it, did a very quick blast dry with a hair dryer just running it through with my fingers, and here is the result.


I’ll be back in a couple of days to to let you know how the treatment held up.

Kitty talks too much on social media, and is trying to keep her essay writing mojo alive in the summer vacation by writing about perfume http://notanose.wordpress.com/


This post: Guest Post by Kitty at Not A Nose - Home Keratin Treatment originated at: Get Lippie All rights reserved. If you are not reading this post at Get Lippie, then this content has been stolen by a scraper
Share:

Tuesday 17 September 2013

Urban Decay Revolution Lipstick & Liner in Manic


I am SO glad Urban Decay have got rid of their old, deeply tacky, lipstick packaging.  Whilst I like skulls and that, having a SWORD as a handle just made me too embarrassed to use the damn things.  Oh, and I regularly used to impale myself on the damn things in my makeup bag, too. 

However, if you coat something in pewter, I've discovered I'm pretty much powerless to resist.  And a hammered finish? I'm in! Luckily for my lips, the contents of the new range of Revolution Lipsticks from Urban Decay is pretty damn fine too.  I picked out Manic as my choice, a lovely wine shade:


It's autumn, and I'm really getting my deep cool shades at the ready for the cooler months to come. Manic is a nice transitional shade from summer to autumn, being rich, but not really very dark, as you can see here:


It's a slightly browned wine, glossy in finish, and the matching liner is just a little more pink, and matte.  They're a good match though - if your lips are on the more pigmented side, the liner will give a nice "My Lips But Better" finish, if you use it to fill the lips in entirely, as I've done below:


The liner is creamy, smooth and velvety soft, and I've found that it applies nicely without any dragging.  However, it does wear down very quickly, so if you want a sharp line (as you will with some of the deeper shades in the range), you'll need to sharpen extremely regularly.  It definitely forms a good base for the lipstick though, you can see both here:


Revolution Lipstick has a lovely soft texture, and feels creamy on the lips (rather than slippery), and they're extremely well pigmented.  The above pic shows one pass of the lipstick (over the liner) on my lips.  I find they last quite well too, taking at least three or four hours before needing a touch up.  They're also nicely pigmented without the liner too:


As you can see, the finish is a little less creamy without the liner, but it's no less pigmented for all that.  It's rather more translucent, but that's about the only difference using it without liner. There are 22 shades in all, ranging from the palest of nudes to the darkest of deep purple-browns, with a lot of really nice reds in between, I have a couple of the other shades too, and I'll show you those soon.

Personally, I don't bother with lipliner much, so I don't really go a bundle on this one (plus, it's so soft I estimate you'd only really get two applications per sharpening, so I'm not sure they're entirely cost-effective), but the new lipsticks are a definite winner ...

Have you tried them?

The Fine Print: Press samples.

This post: Urban Decay Revolution Lipstick & Liner in Manic originated at: Get Lippie All rights reserved. If you are not reading this post at Get Lippie, then this content has been stolen by a scraper
Share:
© Get Lippie | All rights reserved.
Blogger Template by pipdig