Beauty Without Fuss

Popular Posts

Recent Posts

Monday 21 September 2009

COLOUR!

I'm going to spend a few hours this week playing with these:


Can't wait!  Loving the look of the reds  - and the greens - in the palette.  And so many shades of grey, which sounds like it should be boring, but I think grey is one of the most versatile colours you can have in your makeup bag.

Also this week, I'm off to beauty events at Space NK, and Benefit, looking forward to it a great deal, and I'll report back as soon as I get a chance ...
Share:

Sunday 20 September 2009

Makeover: Jane

Meet Jane:


Jane is a good friend of mine, and she's kindly agreed to be my first model in my makeover series.  Jane's 47, works in a University, and has amazing bone structure.  Ordinarily, Jane doesn't wear much make-up beyond a touch of mascara and some Vaseline on her lips, and today we are going to create a glamorous and sophisticated evening look.

The first thing to do is to even out skin-tone with a touch of base, Jane is a little prone to high colour around her cheeks, nose and forehead, so we concentrated on those areas:


We used MAC stick foundation here in NC25, and I used that as a concealer in the corners of her eyes, and a touch of matching MAC Concealer underneath her eyes too. In order to counteract Jane's natural tendency to redness, I used Benefit Bluffdust to set and finish off the base.

Here's how Jane looked after some serious blending:


Jane has beautiful blue eyes, but they need a little more framing, so before we got started on her eyes properly, I filled in her eyebrows a little using Bobbi Brown Blonde eyeshadow:


Just a dab'll do ya ...

For Jane's lids, I used Bobbi Brown Champagne Truffle shimmer wash, with Stone to define the crease:


In the flesh, the Champagne is actually more of a golden-apricot shade which complements Jane's eyes perfectly.  I then went on and added Chocolate as an eyeliner, and finished with two coats of Max Factor 2000 Calorie mascara.


To finish, I added MAC Blushbaby, and a touch of Bare Escentuals Clear radiance to Jane's cheeks, and for her lips, we used Estee Lauder lipstick in Sugar Honey:


Presto!  A lovely, sophisticated - glowing! - look, that can be toned down slightly for the daytime too.

Here's the obligatory soft focus glamour shot:


All photos - except the last - shot in pure daylight and unretouched.

Many thanks to Jane for being so patient and lovely, here's hoping you enjoyed it!
Share:

Saturday 19 September 2009

Stash! Ah - ah ...

Apologies for the Flash Gordon reference there ...


I've had a really busy week (finishing one job, and preparing to start another) so there's been very little blogging, but I'm gearing up for the first in my sets of makeovers tomorrow, and I thought you might like to see some of the stuff I'll be using ... Click on the photo for an enlarged version.

I've spent a few happy hours today researching the look I'm planning for tomorrow. This has mainly consisted of me digging out my copies of Making Faces, and Face Forward by Kevyn Aucoin (and wondering where the hell my copy of The Art of Make Up is, to boot), and I've been happily ensconced in looking at the pictures, reading his wonderfully enthusiastic prose and wondering which looks I can recreate.  Kevyn is probably the first make up artist I became aware of, and his love of women's beauty, particularly the beauty of more mature women is evident on every single page.  There are more make up artists I admire these days, but Kevyn is responsible for my love of changing people's looks, and it's kind of his fault that I do what I do.

More tomorrow.
Share:

Monday 14 September 2009

Makeover: Seona

This is the first of what I'm hoping is going to be a regular series from now on. Every week or so, I'll find a willing victi ... er ... volunteer, and invite them to the Get Lippie HQ, for a beauty consultation and make over. As the sessions won't be beginning for a few days, I hope you'll forgive me for using an oldie - but a goodie - to start.

Meet Seona:

Seona got married almost two years ago, and I was lucky enough to be able to do her makeup for the ceremony. There was a lot of champagne involved, so I thought this was a appropriate "before" shot ...

On the day, Seona wanted a natural, but visible make up. Eschewing the traditional "bridal pastels" so many brides are forced to think are obligatory on their big day, we decided to go with a lightly smokey eye, and a glossy subtly red lip.


The most important consideration for me was that Seona felt comfortable in her look, that it complement her dress, and that the bride would look stunning on her big day.

Seona has amazing eyes, they're blue, but with beautiful yellow speckles in them, and I wanted to make these her main feature. So, after sorting out her base (Bobbi Brown Tinted Moisturising Balm in Light), then powdering it down, I concentrated on using golds, browns and bronzes to make the most of her beautiful eyes:


Here I am demonstrating ... something. Apparently. Actually, I have no idea what I'm doing here, but I'm seemingly contractually obliged to have this photo in this post, or else.

Insert the obligatory "blushing bride" comment here:

Adding the lips:

And here's the finished look:

So there you go, my handiwork in action. Further makeovers will have slightly more focus on how I go about creating the look itself (and fewer shots of the back of my head), but this was one of the most enjoyable days of my career so far, and I wanted to share it with everyone.

Many thanks to Seona and Sally Langstaff for letting me use these beautiful pictures.
Share:

Saturday 12 September 2009

Review - Eyeshadow Primers - The Results!

So, some 13 hours wear later, here's how we're looking:


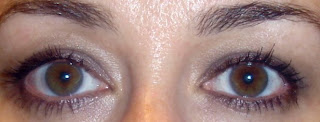
There's some significant fading on both, but this is an eyeshadow that lasts an hour, maybe two without a primer, so that's only to be expected. Both also have creasing, but again, on an eyeshadow that ordinarily simply disappears into the ether, this is really to be expected.

If I were judging this simply on end-of-the-day looks, I'd have to declare Urban Decay the outright winner. However ... the skin on my left eye (with the UD) simply isn't as comfortable on the right, it feels a bit drier, and tauter, somehow. The MAC eye (on the left there) feels like I have nothing at all on my skin. When I went to blend these creases back in, I found that the UD eye stayed firmly creased, but with the MAC one, it was still possible to get rid of the line. This all makes the winner tougher to call than I expected ...

Urban Decay definitely makes your make up last longer, there's no doubt about that. But, this longevity at the cost of a certain amount of comfort, and there's the fact that you have to be quick, and certain, with your application, as once your make up is on, it's not going to be moved.

So, let's break it down in marks out of ten for the specifics:

Packaging
MAC - 8/10 - cute "oil-paint" tubes!
Urban Decay 6/10 - packaging that makes it impossible to get the last few applications out. I've had to cut tubes open before now.

Application
MAC - 8/10 - Just a tiny dab on your fingertip will do both eyelids
Urban Decay- 8/10 - sponge tip applicator spreads product evenly over eyelids.

Colour Trueness
MAC - 7/10 - Colour trueness was good, in isolation, but ...
Urban Decay - 9/10 - not as good as the Urban Decay.

Blendability
MAC - 7/10 - once colour was on the eye, it was fairly easy to blend in, and add more, if needed.
Urban Decay - 3/10 - colour could be blended, but only with a LOT of effort, and if you added too much, well, you were stuck with it, unless you wanted to remove it and start all over again.

Wear
MAC - 7/10 - Definitely faded, and creased by the end of the evening. But shadow and liner, still visible!
Urban Decay - 9/10 - Definitely kept your makeup (and it's creases!) in place. This baby was going nowhere!

Comfort
MAC - 8/10 - didn't make make up feel heavy, and stayed comfortable throughout the day
Urban Decay - 6/10 - no heaviness, but the eyelid definitely felt drier as the evening wore on.

Overall:
MAC 45/60
Urban Decay - 41/60

So, our winner is:

MAC by a very small margin! MAC's ease of use and comfort just edged it as the winner for me, over UD's poor packaging design, and lack of blendability. Sorry Urban Decay!
Share:

Review - Eyeshadow Primers

Today, I've decided to to a side-by-side product test. Two of my all time favourite products are MAC Paint (which I use as an eyeshadow primer, as well as a colour) and Urban Decay Eyeshadow primer. Up until now, I'd be hard pressed to say which was better, so I'm trying them both out at the same time, with an eyeshadow that I already now disappears in the blink of an eye ... so here goes:

WARNING: This post will contain pictures of me without makeup.

Stage one: In which our blogger goes barefaced

At this stage, what I mainly notice is that I've neglected to groom my eyebrows, no matter, won't be making that mistake again! What I also notice is that the MAC Paint on my right eye (left on these pics) reflects the light a little more than the Urban Decay primer on the left eye (right in these pics), I think this is because there is a little hint of shimmer and pigment in the MAC, which the UD is missing.

Stage Two: Wherein the experiment begins in earnest


At this stage, with both eyes open, there is little difference, but with my eyes closed, you can see that the UD primer is definitely better at grabbing the pigment, and the colour is truer. I'm using a loose shadow from Bare Essentials (Smoked Clay), which is a nice greenish grey, but that's hard to pick up with your brush. However, there is a price to pay for this extra pigment being visible, as you'll see in the next stage.

Stage Three: Wherein the colour deepens

I thought that the shadow I was using was too wishy-washy in the first pics, so decided to go for another layer of colour. When applying this, I realise that the Urban Decay is damned difficult to blend over. In fact, it's damn near impossible to blend over after it's had a chance to set for a minute or two. This means that there is a visible line in my socket-crease on my left eye (on the right there), which I'm finding infuriating. Blending is important, vitally important, to any good make up, and the Urban Decay simply won't let you do it.

Stage Four: In which my mascara is uneven.


Here, I've finished adding my eyeliner, and just wanted to see what the difference was between no mascara and one layer of Hypnose Drama (upper, pic) and with two layers of mascara (lower). What it has done is highlighted the fact that I have thicker lashes on my right eye, but longer lashes on my left. I'll be sticking with one coat from now on, I think.

Stage five : in which the finishing touches are revealed

I got around to powdering, adding blush and putting on some lipstick (Ellis Faas in L307, a lovely glossy coral shade) but not fixing that damn eyebrow. That's obviously why I'm looking so unhappy.

Stage six: In which your blogger fixes her hair, and her expression
There we go, I've covered up my pointy spock-ears, and am feeling more human again.

Verdict:

At the moment, they're fairly evenly matched. Whilst you do get a better coverage, and colour trueness with the Urban Decay, this is outweighed with the MAC Paint being easier to blend with. Now, I'm going to see how this look lasts throughout the day, and report back.

Products used:
Urban Decay Eyeshadow Primer
MAC Paint in Untitled
Bare Essentials powder shadow in Smoked Clay
Revlon Wet/Dry Liner in Chocolate
Lancome Hypnose Drama in Black
Bare Essentials Blusher in Poppy
Benefit Bluff Dust face powder
Ellis Faas Glossy Lip in L307
Share:

Thursday 10 September 2009

Review - REN Rose Otto Bath Oil


It's been a funny old week. I got a job offer out of the blue, which caused much soul-searching as I've only just started a new job. This new job offer comes with a shorter commute, more money, and it's back in the industry I love ... A hard decision had to be made - do I leave my cushy new job, and go back to the private sector, or do I stay and spend the next six months wondering if I've made the wrong decision? - and I needed some help making it. After consulting everyone I could get hold of by phone, then asking my adorable Twitter followers what I should do, AND after talking to my boss, I was still at a bit of a loss.

So, I took a bath.

Now, I love baths at the best of times, but, when I'm a bit flummoxed, or just need to escape from the cares of reality for a couple of hours the bath is usually where you'll find me. I do a lot of my best thinking in there, it's a peaceful and comforting place for me. I actually find showers stress me out a little bit, funny but true.

Now, I wanted a nice bath, I needed a nice bath. Then I remembered that last week, I got a parcel of REN goodies from Puresha, so I decided to crack open the Rose Otto bath oil. I confess, I've had a bottle of this before, but it's good stuff. Beyond good stuff, actually. It makes your entire house smell like a rose garden just after a shower of rain, and the smell lingers for hours. It leaves your skin lightly moisturised, and, because the oil disperses entirely into the water, it doesn't leave a greasy ring around the bath, nor will you have an oil-slick on the surface of the water whilst you're in there. I hate that so much when it happens.

A couple of hours later, I had a decision made, and was feeling heaps better. REN don't make any claims for aromatherapy effects from this product, but it certainly helped me relax, and all in all, was probably better for me than the several glasses of wine that I would have ordinarily used to chill out ...

I took the job.
Share:
© Get Lippie | All rights reserved.
Blogger Template by pipdig