Beauty Without Fuss

Popular Posts

Recent Posts

Monday 15 October 2012

How To Make Your Manicure Last Longer

There is very little worse - from a beauty bloggers point of view - than a nail varnish that lasts around 30 seconds on the nails.  It's heartbreaking to discover that the beautiful shade you've just splashed out on has all the lasting power of a soap bubble.  Especially if it's an £18 soap bubble ...

Anyway, there is help, and you can make those ephemeral polishes last longer.  It's a technique called the "Sticky Sandwich", and it's very simple.  I didn't originate this technique, btw, but I use it all the time, because I'm lazy and can't be bothered doing my nails more than once (twice if it's a special occasion), in a week.

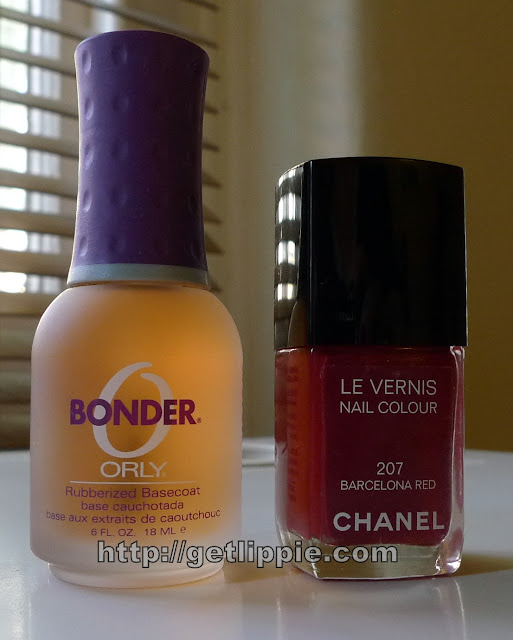
Anyway, here goes, you need a sticky basecoat, and the irritating polish of your choice, I chose these:


Orly Bonder, which is a rubberised basecoat, and Chanel Le Vernis in Barcelona Red. 

Important Note: 


You must make sure that whichever basecoat you use is a STICKY one, ie, one that feels tacky to the touch no matter how long you leave it to dry.  A couple of brands make them, make sure they say something like "high adhesion" or something on the label.  Orly Bonder just happens to be the best one I've found, and this is my second bottle.  The first bottle lasted over a year of more than regular usage and cost me about a tenner from eBay - nowadays you can get it from the newly-revamped BeautyBay for a more bargain-friendly price of £7.95.

Do not be tempted, whatever you do, to use one of those two-in-one Top and Basecoat jobbies, as they dry too shiny for this technique to work. Normal basecoats won't work either, you need something that gives a texture to your base to give your chippy-polish something to grip to.  This is the only time you'll be told that a nail product being stick is a good thing, by the way ... anyhoo, I'm digressing.

Okay, let's make a "Sticky Sandwich"


Step one:
Apply a coat of your sticky basecoat, and leave it to dry.


Step two:
Apply a coat of polish, leave to dry for a couple of minutes

Step three:
Repeat steps 1 & 2.

Step four (optional):
Seal with glossy topcoat.

It's not a complicated technique, admittedly, but it's one that does work.  The sticky basecoat allows both coats of polish to have something to cling to, and this means it takes longer for the colour to chip off the nails.  Even the chippiest of polishes will last at least two-to-three days after this treatment, and if you try it with better polishes, you should get at least a week of wear.  (Ignore anything you read about Orly Bonder giving you up to two weeks of wear, btw, it's total marketing guff).

So, what do you think?  A £7.95 investment that can give your crappy old polishes a new lease of life? Would it be worth it?

The Fine Print: Products are purchases, but the technique is shamelessly stolen from a bazillion other (mainly nail-centric) blogs, I wish I knew who'd invented it, so I could give due credit.  Links are for informational purposes only, and are not affiliate links.
 
This post: http://getlippie.blogspot.com/2012/10/how-to-make-your-manicure-last-longer_14.html originated at: Get Lippie All rights reserved. If you are reading this anywhere other than getlippie.com, then this content has been stolen.
Share:

Monday 8 October 2012

Five basics every makeup bag should have

I get asked, quite regularly, what makeup products every makeup bag should contain, and I always find it a difficult question to answer (I don't really carry a makeup bag round with me, and, when I do, it mainly contains lip products ... the name of this blog didn't come around by accident, you know) but, in response to a particularly heartfelt plea from MummyBarrow, asking for the five products you need to re-stock an empty makeup bag, here's what I think you need in a basic, but well-stocked makeup bag:

1) Base
2) Blush
3) Mascara
4) Eyeshadow/Eyeliner
5) Lip Colour

Here's my product picks:

1) Base 
 
Every makeup bag should contain a base product, whether it's foundation, concealer, or a powder is entirely down to individual preference, but, if I was starting from scratch, I'd pick a pigmented base with some skincare properties - either a tinted moisturiser from a reputable skin-care company, or a BB cream, again from a reputable skincare company (rather than a company better known for their colour cosmetics.  So, which ones would I pick?  Well, depending on budget, I'd either pick:

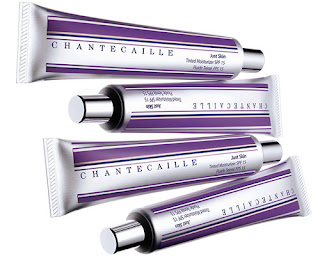
Chantecaille Just Skin Tinted Moisturiser (£57 from Space NK)
Or Dr Jart Regenerating BB Cream (£21 from Boots)


 Both can be used as a moisturiser in their own right (confession, I never use a coloured product in place of skincare, I always use my full skincare routine then use tinted moisturisers etc, but not everyone is as obsessive about their skincare as I am, I admit), and both give great coverage.  If pushed, I prefer the Chantecaille, less mineral oil, nicer fragrance, more buildable coverage as you can apply in successive layers - but the Dr Jart has an SPF of 30,  over and above the Chantecaille's SPF of 15.  The Dr Jart is nice and soothing on the skin though, and doesn't irritate my stupidly sensitive skin. 

A good base is all-important for making the rest of your make-up (however little you spend, and however little attention you pay to it) look good, don't skimp here.

2) Blush

Only one possible choice here, for me, and that is:

New CID iGlow in Coral Crush (£24 from New CID Cosmetics)

This is possibly the most-used cosmetic item in my stash at the moment, and I adore it.  Gives a wonderful glowy lift to my cheeks (it's ostensibly a highlighting product, but I find it pigmented enough to use as a blusher), and it goes with most makeup looks.  It photographs amazingly well too.  Writing this reminds me that I need a backup.

3) Mascara

The mascara I've been wearing most often over the last few months is:

Benefit They're Real Mascara (£18.50 from Boots)


I was slightly underwhelmed with this on first release, but, over the last while, I've come to love it a great deal, and regularly reach for it over and above other fancier (and more expensive) releases.  It's a good, buildable formula that, on me, doesn't flake or smudge, and only comes off when *I* want it too.  Can't say much more than that.  It's a bit wet on first opening though, but after a week or two when it dries out a little, it's a cracking tube of mascara.

The above three products are what I would consider the absolute bare essentials, if you've evened out your skintone with a base, highlighted your cheekbones with blush, and defined your eyes with mascara, then, frankly, any other colour cosmetics are an optional extra.  That said though, here's my pick of eye and lip products to round out a new collection:

4) Eyeshadow/Eyeliner

Sometimes, you just want something quick, and versatile.  When that's the case, I reach for:

Sue Devitt Eye Intensifier Pencils (£18 from Harvey Nichols)

Soft and smudgey, these pencils are a total boon if you're a bit short on time.  You can use them as a soft liner, a base for other shades, or smudge them and create a soft smokey eye look.   They come in a variety of no-fuss, no-worry shades, so there's something to suit most people.

If I was really splashing out, to be honest, I'd also pick up a Cream Colour from Tom Ford in Platinum. A cream eyeshadow that doesn't crease, and isn't greasy, and lasts all day.  I just wish they were a permanent part of the range (and didn't cost £28, but that's a different story).

Clinique are rumoured to be bringing out an eye version of their cult Chubby Sticks, and I, personally, am waiting with baited breath for their release.

 5) Lip Colour

Blimey, where do I start?  When it comes to lipstick, it really is up to you (your budget) and your personal preferences.  For budget preferences, I've discovered I'm a bit of a fan of the Kate Moss range of lipsticks for Rimmel, the matte collection is really cute, particularly in the darker shades.  If you want something a bit less fussy, then the Clinique Chubby sticks:


Might be what you want: Retailing at around £14, they combine the best parts of lipbalm and lipstick.  There's a whole slew of imitators around, but I definitely prefer these for their superior balm properties (little known fact, Clinique's range of superbalm lip products are amongst the best balms on the market, for me at least), and their sheer range of shades.  They're releasing an "intense" version now too, which have more pigment ... I may already have a couple, and will be bringing you a full review soon ...

If you want to splash out, and still have a balmy consistency, well, then you need a Chantecaille Lip Chic.  Which is, for my money, the most divine lipstick formulation in existence.  If you really want to push the boat out, well, then, head yourself over to Tom Ford.  Or pick yourself up a Guerlain Rouge G.  You know you want to ...


 This post originated at: http://getlippie.com All rights reserved.
Share:

Thursday 4 October 2012

How To De-Scent A Lipstick, featuring Art Deco

I mentioned de-scenting lipsticks on my Facebook page recently, and got lots of messages about blogging the method, so I thought I'd tie it into a review of two lipsticks that I bought recently (and really like) but had troubles with the smell of.

Oops, always photograph before swatching, you 'nana!
Above you can see two Art Deco lipsticks in the velvet formula in 235 (on the left) and 628 (on the right), which are wonderful lipsticks, 235 is a brown-rose shade, and 628 (from the Dita's Classics collection - which I highly recommend, btw) is a warm dark red.  I love the Art Deco Velvet lipstick formula, it's on the matte side, but doesn't dry your lips out, and the pigment lasts and lasts and lasts ...

Swatches:


I adore practically everything about these lipsticks, aside from the scent, which is a vanilla fragrance which some people love, and I - personally - cannot abide. It's very, very similar to the scent of MAC lipsticks, which I think smells like chewed up paper.  But, like I said, some people love it!  Scent is such a personal thing in cosmetics, I've found.

Anyway, the scent in these was so strong, that I felt compelled to try de-scenting them, and I'm happy to report that, whilst the scent hasn't disappeared completely it's now been knocked down to far more tolerable levels.

The method?  Well, it's fairly simple, take your highly-fragranced lipstick, and do this:


Yes, take the tops off them. you don't need to twist them up - though you can do, if you have somewhere safe to put the lipsticks - i.e. somewhere you won't knock them over.  This is important because of the next stage:


Step two: leave them alone for at least 24 hours.  Some lipsticks will only take a day, some more persistent lipsticks may take two or three.  What you're doing is exposing the lipsticks to the air for long enough to allow the volatile scent oils to evaporate. These took around two days.

Step three: After a day, give them a sniff.  If the scent has been knocked back far enough for you, then pop the top back on, and use it from that point forward with abandon!  If it's still a bit whiffy, then leave the top off for another day, and repeatt step three until the scent is at an acceptable level.

So, yes, really quite simple.  Don't worry, your lipsticks won't dry out, but I really wouldn't recommend doing this for more than, say, three days...

Hope this has been helpful!  Let me know in the comments! 
 
This post: http://getlippie.blogspot.com/2012/10/how-to-de-scent-lipstick-featuring-art-deco.html originated at: http://getlippie.com if you're not reading it on Get Lippie, then this content has been stolen by a scraper. All rights reserved.
Share:

Wednesday 3 October 2012

The Oddest Lipstick in my Collection

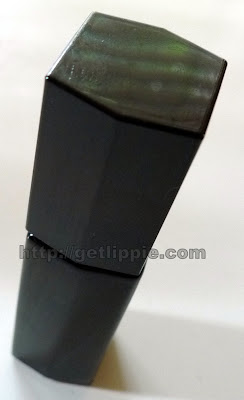
 This little monolith looks fairly innocuous, no? Well, it's one of the oddest, and most expensive, makeup products I own.  It's actually a Serge Lutens Water Lip Colour, and when it turned up in a goody bag at a Serge Lutens fragrance launch, I was about as excited as I could be.  I thought there were only two shades, Chardon, a red, and Safrane, an orange, and I wondered which shade I would get.

I was wrong, by the way, there are three shades.  Number three is Indian Ink.  A black. Guess which one I got?


Yeah, you got there ahead of me, didn't you?  A black lipstain.


I love the applicator, it looks like some kind of exotic sea-creature from the depths, it's rather cool. And, surprisingly, it really helps with the application, being easy to get into all your lip crevices.

However, it's black.  Well, grey, rather:


It's actually oddly useable, you can use it to stain your lips darker, to give a different dimension to lipshades that need darkening, or you can use it to fake bruises:


What's the oddest thing in your makeup collection?

This post: http://getlippie.blogspot.com/2012/10/the-oddest-lipstick-in-my-collection.html originated at: http://getlippie.com If you're not reading this on Get Lippie, then the content has been stolen by a scraper. All rights reserved.
Share:

Tuesday 2 October 2012

Top Three: Illamasqua Lipsticks Box, Magnetism & Salacious


I love a bit of lipstick.  Some of you might have noticed.  I also love a bit of Illamasqua, so I thought I'd show you my top three Illamasqua shades.

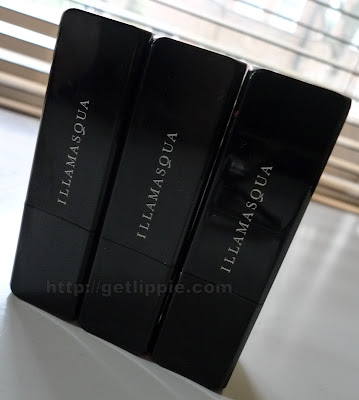
Step forward Box, Magnetism and Salacious:


Box is a classic blue red, Magnetism is a cool raspberry, and Salacious is a beautiful pink-red. Here's a closer look:


Whilst I adore these colours, I'm not always a fan of the Illamasqua lipstick textures, to be honest.  These three all have different textures, Box is a very dry texture that can drag on your lips somewhat, Salacious is extremely pigmented, much more so than the other two, but is a bit creamier than Box.  I think Magnetism has by far the best formula of the three, it has a good slip, and a slight sheen, and is a bit less drying on the lips as a result.  

Artificial Light

Natural daylight.

Texture, and formula, issues aside, I do genuinely love these shades.  Salacious was the first Illamasqua lipstick I ever bought and I love the colour, is it pink? Is it red?  Well, depending on what you wear with it, it can appear either colour, that's why I like it.  Box is a classic red that no makeup bag should be without (just make sure you use plenty of lip balm first), and Magnetism is a flattering raspberry shade, that suits almost every skintone.

What's your favourite Illamasqua lipstick?

This post:  http://getlippie.blogspot.com/2012/09/illamasqua-lipsticks-box-magnetism-salacious.html originated at: http://getlippie.com All rights reserved. If you're not reading this on Get Lippie, then this feed has been stolen by scrapers.
Share:
© Get Lippie | All rights reserved.
Blogger Template by pipdig